


Turn the corner
Leo and I went on a day trip yesterday. I would post all the pictures here, but then I'd have a huge unwieldy post with no room for knitting, so go ahead and check out the gallery here, if you like. If you are wondering, there are plenty of Panda pics to make it worth your while.
In knitting news, I've been finishing up my Hopeful. I had to rip a few times to get things right, but it appears I'm on the right track.
As written, the neckband is worked by picking up a relatively small number of stitches along the neckline and knitting in 2x2 ribbing, back and forth, picking up one stitch from the neckline, every other row.
This works fine and for anyone knitting the piece, don't feel you can't do this.
The challenge with neckline details is getting them to lie properly. If you look at the way they are shaped, the edge against the garment itself is longer than the free edge because it follows along a curve. It's like a donut, the inside hole of a donut is smaller than the outside edge.
Mmmmm....donut
The way the pattern is design, you knit the tie to be the length you wish the inside to be (the donut hole) and stretch along the outside edge.
Below, you can see a picture of how I'm approaching the neckline. I'm using short rows to turn the corner at the shoulder seam.
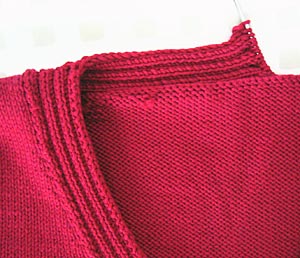
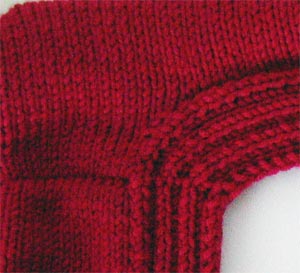
Here is a view of the neckband laid flat. You can see the shoulder seam on the left and the ribbing turns around the corner. The effect is achieved very easily if you are comfortable with basic short rows. Since the pattern requires short rows for the sleeves, it's well within the abilities of anyone knitting the piece.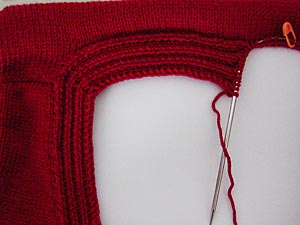

Note the blue and green lines in the second picture. Blue lines indicate normally knit rows, while the green indicate how the short rows work.
I knit straight to the shoulder seam, finishing on a right side row so that I'm ready to start a wrong side row.
From there, I worked only 2 stitches, wrapped, turned work and worked those 2 stitches as though completing a normal row (knitting last stitch with one neckline stitch)
The next row, I went two stitches farther than the previous row.
I repeat this process, going two stitches further each time, until I've done a wrap around the second to last stitch and worked back.
Now, I just continue working straight until I am 6 stitches shy of the next shoulder seam. I'll have to reverse the shaping at that point. I hope to have pictures of that soon.
One note on this, I had to rip my first attempt because I did not change the number of stitches picked up along the back edge. The instructions indicate that you should pick up every other stitch along the back of the neck. For this technique, you should pick up 3 stitches for every 4 stitches along the back.


<< Home