Hopeful Notes
Hopeful is done, though all I have is this crappy image because it's still dark out and I can't get a decent picture. I hope to have something better soon.
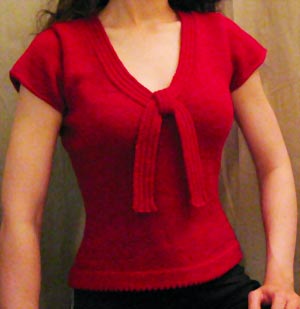
Pattern Specs:
Name: Hopeful
Designer: Jenna Adorno
Size: 36" chest
Yarn: Karabella Aurora 8
Color: 21
Quantity: Just under 8 balls including swatches
General info on pattern:
For every $5 purchase, $6 goes to Susan Love's breast cancer research foundation. For that reason alone, I think this pattern is well worth its price.
As for the piece, it's nearly entirely seamless and employs short row sleeves that are great fun to knit. If you have never knit a piece in the round or are scared of short rows, this may be a nice foray into both.
The general aesthetic of the piece is clean and flattering without being overly fussy. Designed for a very petite woman, there are details that may need to be reconsidered to best flatter the wearer.
To start with, I decided to work a provisional cast on and not work the horizontal garter ribbing at the base. This freed me up to consider other treatments at the bottom.
After that, I assessed the general shaping of the piece, which is suitable for someone with a very short waist and compact frame.
Please see schematic below.

Worked from the bottom, up, the pattern indicates that you work straight for several inches before working your waist decreases, then your chest increases, at which point, you work straight again for several inches.
This makes a largely square piece with a quick tuck in the middle.
If your torso is fairly compact, this will look wonderful on you.
I modified this design for a more standard shape. I have a fairly long torso (and, alas, relatively short legs), so I spaced the decreases over a longer stretch of rows and added a few more decreases to bring the waist in a bit more. I reversed the process for the increases.
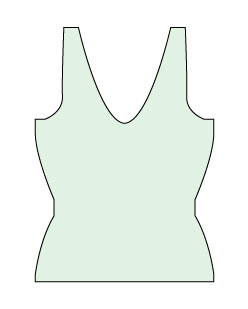
This is what my schematic would look like.
Speaking of shaping, I also made a modification to the way in which the full fashioned shaping was worked. Increases and decreases have a very distinct look. I wanted the increases to look as much as possible like the decreases. The pattern indicates that you work a single knit stitch in between the two decreases or increases as needed on a row. The visual effect made the increases appear closer together than the decreases. Your results may vary, depending on which increase you work.
In my version, I worked the decreases with 2 stitches between them, and the increases with 4 stitches between them.
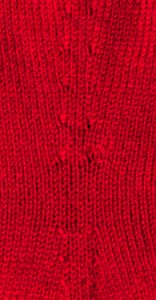
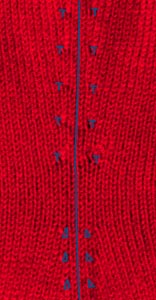
The left shows the visual effect on the finished piece. The right shows where the actual increases and decreases are worked.
The next modification I made was to the way the neck and armsceyes were worked. The neckline splits before the armsceyes. The pattern indicates that the two front pieces and the back split when the neckline is started, leaving short seams on both sides of the piece. Since this is really supposed to be a seamless sweater, I cut the yarn and started anew at mid front. I worked back and forth from one side of the neckline to the other for the distance from where the neck started to where the armsceye started. Then I split the piece into the 3 sections as indicated in the pattern.
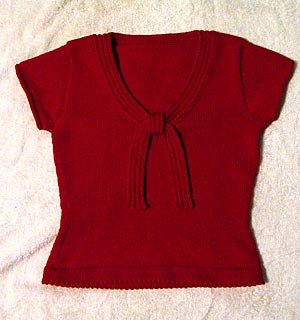
I decided on a hem after completing the remainder of the body and the sleeves as indicated in the pattern. To see my tutorial on the hem, please click here.
Next, I modified the way the neckline was worked. Please see my tutorial here.
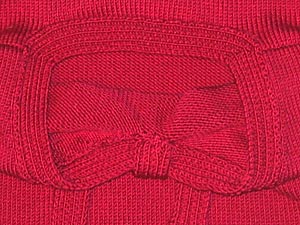
The last minor change I made was to the front tie. Instead of doing the i-cord, I decided to mimic the look of an actual knot by knitting a short length of 2x2 ribbing and wrapping it around the ties. This is slightly more bulky than the indicated treatment and may not be a good option for everyone.
That pretty much sums up my approach to the piece. If anyone needs clarification on anything I did, don't hesitate to ask.

Pattern Specs:
Name: Hopeful
Designer: Jenna Adorno
Size: 36" chest
Yarn: Karabella Aurora 8
Color: 21
Quantity: Just under 8 balls including swatches
General info on pattern:
For every $5 purchase, $6 goes to Susan Love's breast cancer research foundation. For that reason alone, I think this pattern is well worth its price.
As for the piece, it's nearly entirely seamless and employs short row sleeves that are great fun to knit. If you have never knit a piece in the round or are scared of short rows, this may be a nice foray into both.
The general aesthetic of the piece is clean and flattering without being overly fussy. Designed for a very petite woman, there are details that may need to be reconsidered to best flatter the wearer.
To start with, I decided to work a provisional cast on and not work the horizontal garter ribbing at the base. This freed me up to consider other treatments at the bottom.
After that, I assessed the general shaping of the piece, which is suitable for someone with a very short waist and compact frame.
Please see schematic below.

Worked from the bottom, up, the pattern indicates that you work straight for several inches before working your waist decreases, then your chest increases, at which point, you work straight again for several inches.
This makes a largely square piece with a quick tuck in the middle.
If your torso is fairly compact, this will look wonderful on you.
I modified this design for a more standard shape. I have a fairly long torso (and, alas, relatively short legs), so I spaced the decreases over a longer stretch of rows and added a few more decreases to bring the waist in a bit more. I reversed the process for the increases.

This is what my schematic would look like.
Speaking of shaping, I also made a modification to the way in which the full fashioned shaping was worked. Increases and decreases have a very distinct look. I wanted the increases to look as much as possible like the decreases. The pattern indicates that you work a single knit stitch in between the two decreases or increases as needed on a row. The visual effect made the increases appear closer together than the decreases. Your results may vary, depending on which increase you work.
In my version, I worked the decreases with 2 stitches between them, and the increases with 4 stitches between them.


The left shows the visual effect on the finished piece. The right shows where the actual increases and decreases are worked.
The next modification I made was to the way the neck and armsceyes were worked. The neckline splits before the armsceyes. The pattern indicates that the two front pieces and the back split when the neckline is started, leaving short seams on both sides of the piece. Since this is really supposed to be a seamless sweater, I cut the yarn and started anew at mid front. I worked back and forth from one side of the neckline to the other for the distance from where the neck started to where the armsceye started. Then I split the piece into the 3 sections as indicated in the pattern.

I decided on a hem after completing the remainder of the body and the sleeves as indicated in the pattern. To see my tutorial on the hem, please click here.
Next, I modified the way the neckline was worked. Please see my tutorial here.

The last minor change I made was to the front tie. Instead of doing the i-cord, I decided to mimic the look of an actual knot by knitting a short length of 2x2 ribbing and wrapping it around the ties. This is slightly more bulky than the indicated treatment and may not be a good option for everyone.
That pretty much sums up my approach to the piece. If anyone needs clarification on anything I did, don't hesitate to ask.


<< Home