


Ribbing Ennui
Knit one, purl one, repeat.
75 times per round (150 stitches per round)
11 rounds per inch
4.5 inches
_________________
Total = 7425 stitches so far
But who's counting?
I was beginning to feel like I couldn't stand to work this thing any longer. It felt like it was just mocking me, round after round, without growth. "No one will think I worked this, I'll put it on my blog and it will look just like the previous picture." I thought to myself.
Well, "kiss my grits," I say, because looking back through my previous post, it does, indeed, appear longer. Hoorah!
This may make progress a little more likely, but even the prolific author of Fluffa! comments on the mind numbing effect of eternal ribbing. No wonder man invented the knitting machine.
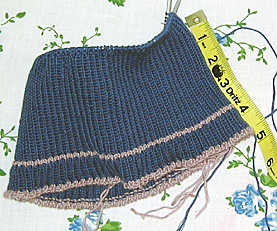
Don't get me wrong, I'm very pleased with how the hat is progressing but I cannot work ribbing in the continental manner when it's in the round. Since the stitches are now oriented the opposite way, I find the technique nearly impossible. I work in the Combined method which is absolutely wonderful for working ribbing flat, but I wanted Leo's hat to be perfect, so it's jogless and seamless. Oh, what we do for love.
To give my poor, over-ribbed brain a break, I've started working with the Paco yarn.
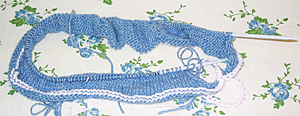
It's only 12 rows long and it's been pulled out and reworked once, already. Just as a funny little side note, Paco and Leo's hat are both the same number of stitches per row/round.
As you may be able to tell, I've worked a provisional cast-on for this piece. I'm starting the piece from the empire waist on up, then I'll work the sleeves and the lace, and whatever yarn I have left, I can use for the rest of the piece, worked from the empire waist on down. I want the piece to go to my hips, if possible, but I'm not sure I have enough yarn. Working in this method should allow me to maximize my yarn usage. I'm also working the front and back at the same time, it takes a little longer to finish a row, but I save myself a lot of time in the seaming process.
As another bit of trivia, here's how I write up my patterns for myself
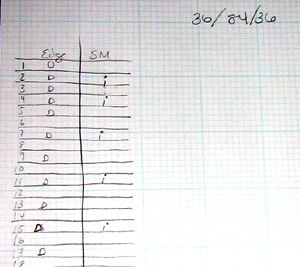
I find it impractical to read through a whole pattern row's instruction when I only care about the location of increases and decreases. This is a section of my notes for the point from the empire waist to the armhole bind-off. The edge stitches are indicated in the left-hand column and the stitch markers are indicated in the second column.
So, on row 11, I have a decrease on each end of the round and an increase on each side of the two stitch markers (indicating the side seams).
The last thing that I'll leave you with today are some pictures from Leo's drive from San Francisco back down here to LA. He was up there for a couple days last week and took these pictures to show me what I was missing. The pictures are from the coast in the SF area and from Big Sur.
Check 'em out.


<< Home