All create along posts

Lily

| 26 Comments

It's a relief to have this finished. UFOs really irk me, I think because I'm so bad about revisiting them if I've lost my momentum. I seem to be getting better at it, with age, but I still think I do best with a big burst of inspiration.

Finished Lily Front

You know what's funny? This might be one of the few garments that looks a little better on me than the mannequin. The very narrow hips and shoulders of my stand-in, make the piece look unbalanced (top heavy?), to my eye. Still, she holds still which is useful on these overcast days.

Finished Lily w/ Thea

When I first started designing this, I felt sure that I did not want ribbing at the neck and hem. I can't remember why, because I actually really like it, now. At the sleeve hem, I just used a simple i-cord bind-off to maintain the rather pronounced scallop that the lace produces. But, at the neck and hem, I think the ribbing does a nice job of producing a clean finished edge.

Finished Lily Neckline

Speaking of the neckline, I used a few decreases to keep that boat neck from falling off the shoulders. It juuuust covers my bra straps. I could probably have done a little more ribbing if it bothered me, but right now, I like it.

I really don't think I need to say much about my love for Calmer. I've used it quite a few times before and love it to pieces. It's soft, soft, soft, soft, soft, and for those of you who can't stomach the price, I think you'll be pleasantly surprised at the yardage and how far it goes, when knit at the recommended gauge.

All in all, I think it's another piece I'll actually wear. I'll try to get a shot of me in it, eventually, but it's a bit too rainy and cold right now.

Dusting off Lily

| 14 Comments

Do you remember Lily? Well, I sure do. I have kept the bag she's been in, in plain site, since I last worked on her in May. Oy vey. I put Lily into time out after trying her on, and feeling the design had gone astray. The motifs, running along the raglan, were coming so close together that they appeared to draw an (unattractive) arrow to my face. When I tried her on, I knew I was not happy with the look.

I put Lily aside and I wasn't sure that I'd come back. I usually have a very hard time revisiting sleeping projects.

But, something about the soft olive colored calmer and the lily of the valley motif, drew me back.

So I pulled out Lily and simply started ripping. I figured I'd have to rip back to the armscye, or further. But something stopped me, after only a dozen rows. I decided I should put all my stitches onto waste yarn and throw Lily on the mannequin.

The piece was rumpled but the little bit of ripping proved to be a good starting point.

IMG_0016.JPG

I realized, I had it all wrong. I was going for a boat neck, but I was trying to make the neck too high. I think this piece is salvageable with minimal modifications.

I gave Lily a bit of a steam, and I'm back in the race.

IMG_0043.jpg IMG_0039.jpg IMG_0041.JPG

I'll tackle the neckline first, resolving that issue, before dealing with anything else. After that, I'll probably close up the vents at the hem and work a bottom edge that matches the neckline.
Finally, after all that is done, I'll assess the sleeves.

Let's see if I can take the U out of this UFO.


For those of you who like looking under the hood, I've uploaded some detail shots of the Linen Top, including the final ribbon I've chosen.

I don't have any immediate plans to write a pattern, but I think some people might be interested in a look at how the garment was constructed.

IMG_0030.JPGIMG_0028.JPGIMG_0026.JPGIMG_0024.JPG

Using Excel for Complex Lace Charts

| 8 Comments
Cross posted at the Create Along

This tutorial is the 4th in my set of Excel tutorials. You can see the others here:

And, if you happen to have any tutorials of your own, please let me know.

In my last tutorial, I cover creating simple lace charts in Excel. Today, we'll approach a more complex lace pattern and introduce the no stitch. The lace pattern, I'll be covering, is most of the Peri's Parasol pattern I used in Chapeau Marnier.

What is a "no stitch"

More than any other single question, I get this most of all and I think it boils down to a lot of over thinking from the knitting community. Often, people ask if it means a stitch should be slipped. A no stitch, in fact, simply means there is no stitch in that spot. Some lace and cable patterns, change stitch count from row to row. The chart can be made a little more intuitive by distributing the stitches in a logical manner and spacing them with "no stitch" blocks. Generally, when using a "no stitch," one should format it in such a way that it can easily recede from focus. I usually shade mine in gray or black.

Format your spreadsheet

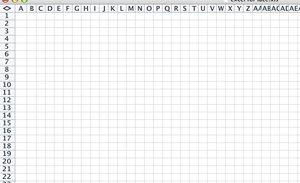
I begin, as always, by adjusting my cells so that they are approximately stitch like in proportion. See the tutorial on colorwork for more information about this step.


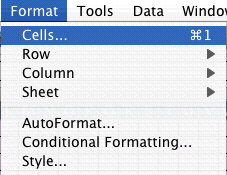
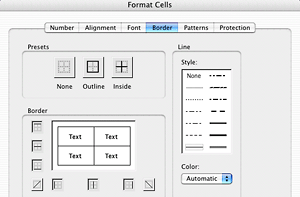
Select all the cells, go to the FORMAT menu and choose CELL


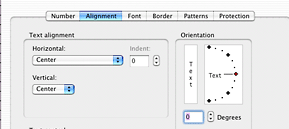
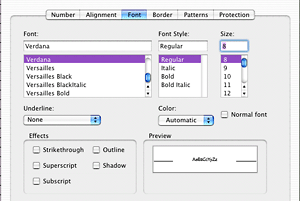
Set the alignment to be centered both horizontally and vertically. This will ensure your symbols are centered. Set your font size and add borders to all your cells.


Cross posted at the Create Along

People run pretty hot and cold, when it comes to the topic of charts. Personally, I'm a big fan of them, and when it comes to lace, I find it nearly impossible to work without a chart. If you saw my knitting notebooks, you'd see that, no matter how simple or complex, I always chart my lace patterns out. If you enjoy working from charts or if you ever need to create a chart for a pattern, you can produce good clean results with spreadsheet software like Excel. I've created several tutorials in the past, which you can access here. This tutorial will use some of the same techniques I've covered in Using Excel to design colorwork and Using Excel to aid in writing multi-sized patterns. If you haven't seen those tutorials and you aren't comfortable using a program like Excel, I suggest you browse them to get the basic concepts of working in Excel.

The lace

I've chosen a very simple lace stitch pattern, designed by Dorothy Reade, which I'm using in Donna Druchunas' upcoming book.
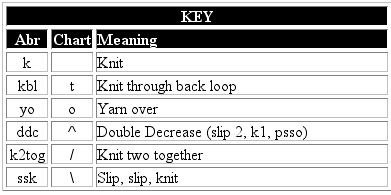
key.gif

Here are the verbose instructions.

Multiple of 6+7
Foundation row: k1, *kbl, yo, ddc, yo, kbl, k1* repeat to end of row
Even numbered rows: Purl
Row 1: ssk, *yo, kbl, k, kbl, yo, ddc* to last 6 stitches, then, yo, kbl, k, kbl, yo, k2tog
Rows 3, 5, and 7: ssk, *yo, k3, yo, ddc* to last 6 stitches, then, yo, k3, yo, k2tog
Row 9 and 13: k1 *kbl, yo, ddc, yo, kbl, k1* repeat to end of row
Row 11: ssk, *yo, kbl, k, kbl, yo, ddc* to last 6 stitches, then, yo, kbl, k, kbl, yo, k2tog

These instructions could be compressed even further, as the foundation row, 9, and 13 are all identical and 1 and 11 are identical. Even so, I find it hard to use these instructions to visualize what I'm doing. I also find that it takes me longer to memorize a lace pattern if I can't see it charted out.

Set up your workspace

Select all the rows and cells in your Excel sheet and adjust the size of the cells to mimic the shape of a knit stitch. If need be, refer to the colorwork tutorial for more information on how to do this.

Based on the verbose instructions, I see that the +7 is made up of one stitch at the beginning of the row and 6 at the end and that there is a foundation row and 7 public side rows. Because I know this, I can number my rows and add grid lines.
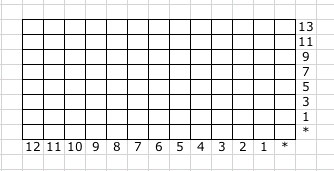
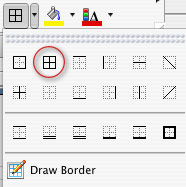
If you can't determine this from reading the instructions, just begin charting your lace, and go back add the row and stitch counts and your grid lines, later.

Inserting the first row of symbols

Foundation row: k1, *kbl, yo, ddc, yo, kbl, k1* repeat to end of row
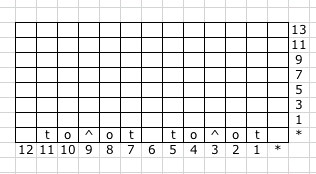
There is no need to download fancy schmancy knitting fonts. You can communicate with your standard set of characters. See the key above, to see how I've translated the stitches to letters. Use characters that will make sense to you. I like a blank stitch for knit, "t" for "twist," "o" for "yo," and slashes and a carrot for the decreases. Don't like that? Do something different. I won't hate.

The first row with a modified last repeat

Row 1: ssk, *yo, kbl, k, kbl, yo, ddc* to last 6 stitches, then, yo, kbl, k, kbl, yo, k2tog
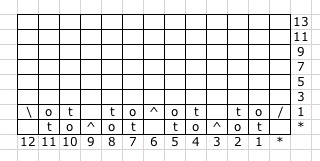
The first row in which we have a reason for those extra 6 stitches at the end. While the main pattern repeat requires a double decrease, the first and last decreases of the row will be single decreases. You will be able to see this more clearly when we get to the end.

Convert remaining rows to chart format
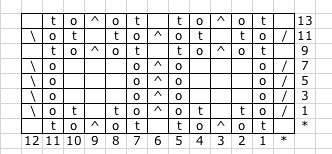
Complete the pattern as indicated in the verbose instructions. Whenever I can, I like to copy and paste, duplicate stitches and rows. Do whatever works best for you.

Double check your work, going stitch by stitch from text to chart.

The end results are neat and clean, but would probably cause confusion. It's not clear where the pattern repeats begins and ends.

Outline the repeat

Select the stitches that make up the repeat. In some patterns, this is very intuitive based on how the pattern is written, but some patterns are harder to distill down to a repeat, especially those where the location of the repeat shifts for one area to another. Lucky for us, this pattern is expressly written to make the repeat obvious, it's everything between the two asterisks [*]
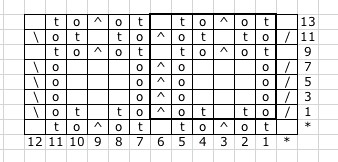
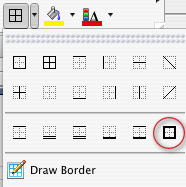
Just select the stitches you want to outline, and choose a thick border to outline it. You can choose a custom border by going to the FORMAT menu and choosing CELL.

Shading for clarity

Finally, to make the repeat really obvious, shade everything that only gets worked once per row. This makes the repeat really clear and visually indicates the secondary elements.
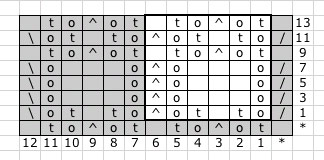
I think that you'll find that many lace and knit/purl stitch patterns can be worked up this way. Have fun with it.

In the next tutorial, I'll cover doing more complex lace charts and discuss the ever-confounding "no stitch."

This entry also posted at the Create Along.

Download the spreadsheet and play along at home.

It's been a while since I've done a tutorial and seeing as I use this technique all the time, it's about time I shared it with all of you. This also makes me feel better about the fact that I do not have any updates on my CAL project to post, as my deadline pieces are all keeping me busy.

NOTE: The attached spreadsheet is just a sample and contains measurements that may be useful but which may not meet the standards for some publications. You are welcome to use what I have for your own design purposes but it'll be you who has to ultimately support any patterns written from it, so do your research first.

The goal

Excel can be used to help you organize and plot your final pattern. Unfortunately, it can't do all the dirty work, but you can find yourself being a bit more consistent, if you let the program do your calculating. If you plan to submit your patterns for publication, providing a spreadsheet with all your work can be of great help to the tech editor. Doing so, may make logic errors more obvious and allow for faster editing.


A rough schematic of what we are shooting for

Share this page

About this Archive

This page is an archive of recent entries in the create along category.

design is the previous category.

excel is the next category.

Find recent content on the main index or look in the archives to find all content.

August 2016

S M T W T F S
  1 2 3 4 5 6
7 8 9 10 11 12 13
14 15 16 17 18 19 20
21 22 23 24 25 26 27
28 29 30 31      

Find Me Here

  • rss
  • facebook
  • twitter
  • flickr
  • goodreads
  • google
  • linkedin
  • pinterest
  • ravelry
  • youtube

Featured Patterns