All tutorial posts

Can we grep about Photoshop

This is sort of a strange blog post as it's not really knitting related, has no puppies and addresses an obscure problem that most people will never have, but I'm of the mind that if I know how to fix a problem I've had, there's bound to be someone else out there with the same problem so I might as well share.

Our website's online ordering application accesses files stored in a series of folders. Within the folders, all the naming conventions are the same. The folders themselves are all numbered, though not sequentially. We had 1000 folders and within each folder is an image called, "sample.jpg" and each of those images is a preview of the product being sold, so they are all different. We wanted to open all those files and use Photoshop's Save for Web function to optimize them. However, Save For Web doesn't remember the image's source folder. It remembers the last place Save For Web saved to, which means if you were to batch process the images, each would overwrite the last in some common folder. Even if we numbered the images, sequentially, they wouldn't match up with their folder number since the numbers all jump around. Any solution I could think of ended up being pretty labor intensive with plenty of chance for error.

I posted on the Adobe Forums and got bupkis.

I figured I had nothing to lose and posted on Facebook. A few hours later, a friend in Australia had a solution for me.

I decided to do up more detailed instructions, suitable for someone who has never worked with unix, grep, or scripting before. You can download the instructions and sample files from this page. Please note that these are Mac specific instructions. Pretty much everything should translate to some sort of PC equivalent, but I'm not the person to help you sort that out.

I could see this being handy for anyone who has a lot of image files on their site that they might want to resize or optimize, quickly.

If you think any of this would be useful, feel free to download the files and don't hesitate to let me know if you have any tips, corrections or suggestions.

This is part three of a three part series on adding your signature to digital files. In the first part, we discussed making a TIFF of your signature, in the second part, we added that signature to Microsoft Word. In this part, we'll use InDesign to add our signature to a PDF. We'll also learn about filling out forms in InDesign.

If you want to play along with the home game, you can download the signature, a sample Microsoft Word contract and a sample PDF contract by clicking the links.

For this step, you'll need:

  • the digital version of your signature that we made in the first tutorial
  • sample PDF contract
  • InDesign*
  • A rudimentary understanding of InDesign and it's most basic selection and text tools

*I'm using InDesign CS5 on a Mac. This should work in other desktop publishing programs, including Scribus, a free open source alternative, but the individual steps my vary. You can refer to your help menu or user manual for more guidance.

For the sake of simplicity, I'm going to opt for the least technical explanations, I can. Most steps have a keyboard shortcut equivelent, but I'll tell you where the option is in the menus, and I will describe tools by how they appear, not necessarily by their technical name.

Open InDesign and create a new document. You will want to have the same number of pages as there are in your contract. Set your margins to 0 and make sure your pages are the same size as your contract. Contracts from Europe will likely be on A4 sized pages. Contracts from North America will likely be on Letter sized pages. That's pretty much the extent of my default paper size knowledge. Since you don't need to print anything out, it doesn't matter, your digital file can support either or both sizes, if you like.
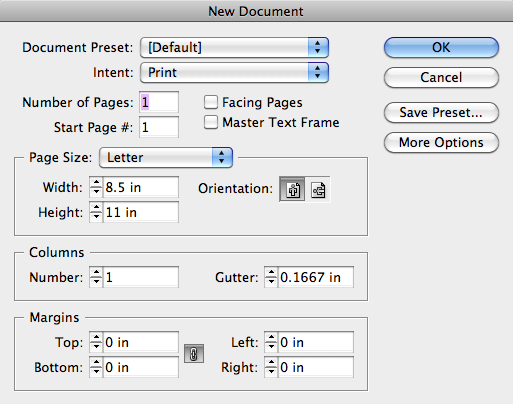
New document dialog box


The next step is to place your PDF. Go to FILE | PLACE and navigate to the PDF of your contract.
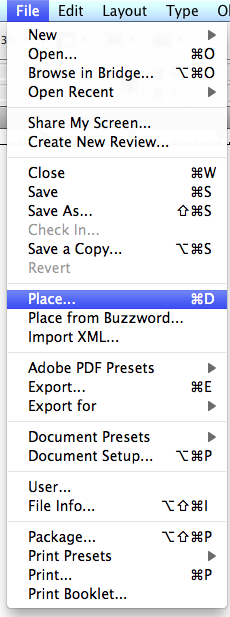
place
File | Place


IMPORTANT: click the SHOW IMPORT OPTIONS check box before proceeding.
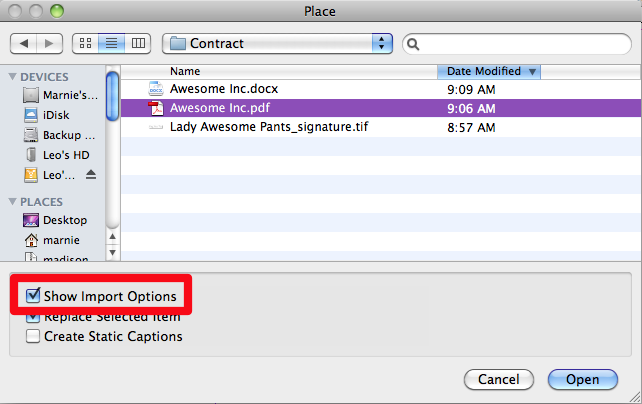
Show import options
Show Import Options


This will bring up a set of import settings. Choose to import ALL the pages and set the "Crop to" drop-down to "Media".
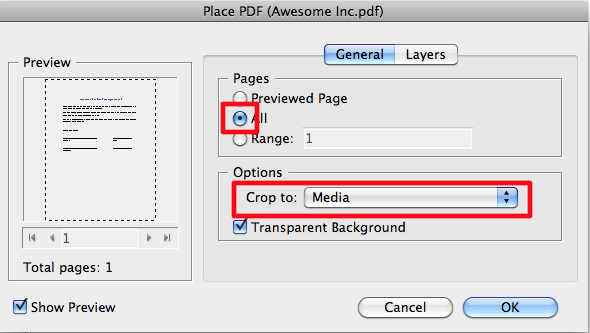
import settings
Import settings


Your cursor will change, giving you a tiny thumbnail of the first page of the contract. Click in the upper left corner of your page to place the first page of the contract. If you have multiple pages to your contract, the next page will now be loaded into your cursor and you can place it on the next page of your InDesign document. Continue this process until all pages have been added.
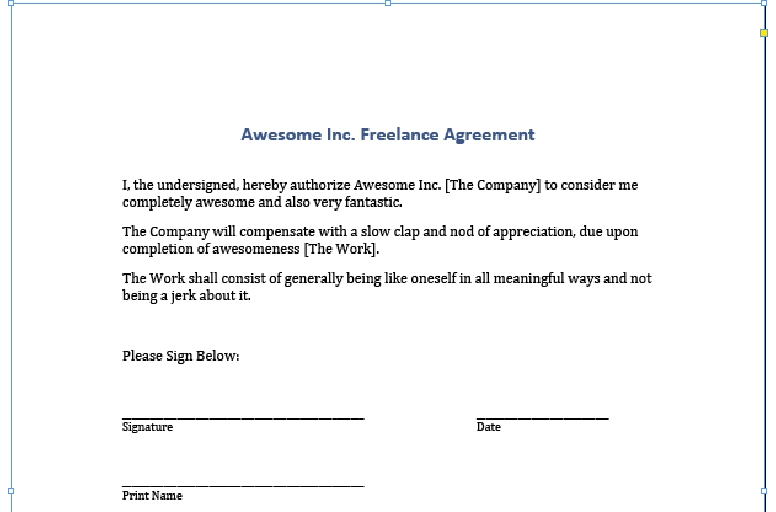
place contract pages
Contract is now placed in InDesign


Note: The default setting in InDesign is to show a low resolution preview of the PDF in InDesign. This is not reflective of the actual quality of the file. The quality is determined by the original PDF and whatever export settings you use when you make the signed version of the PDF.


Navigate to the point in the document where your signature should appear. Go to FILE | PLACE, as we did above.

Select your signature file but turn off all the check boxes that were turned on before. We do not want import options and we do not want the signature to replace any selected images.
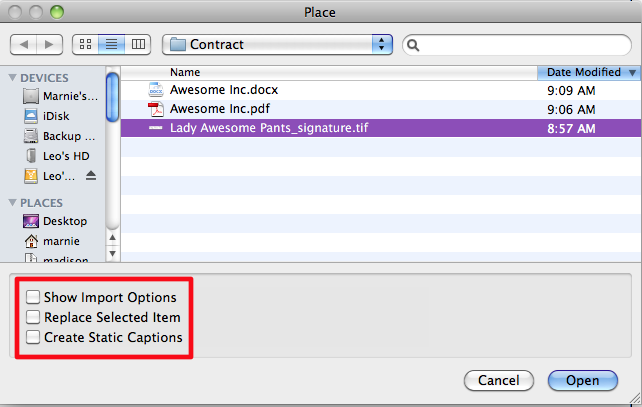
select signature file
Find your signature and turn off import options


Your cursor will now be loaded with the new image. If you just click, anywhere on the page, the image will appear, or you can click and drag a box that matches the size you want your image to be. Either method will work but the latter will save you the step of having to resize your signature.
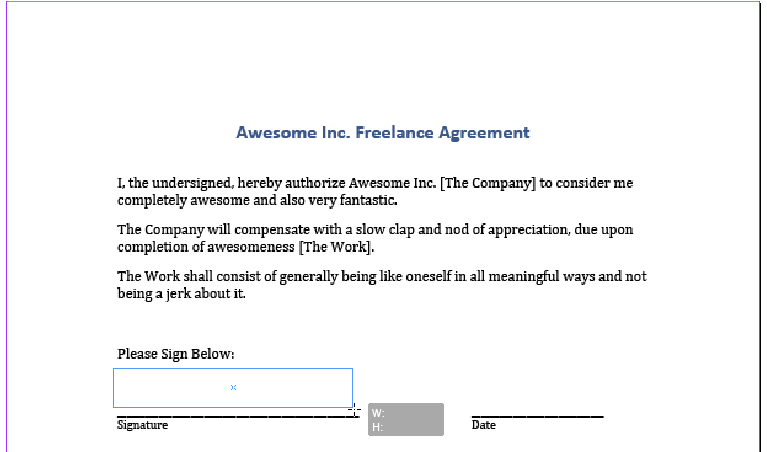
place signature
Place your signature


With the black arrow tool selected from your toolbar click the signature.
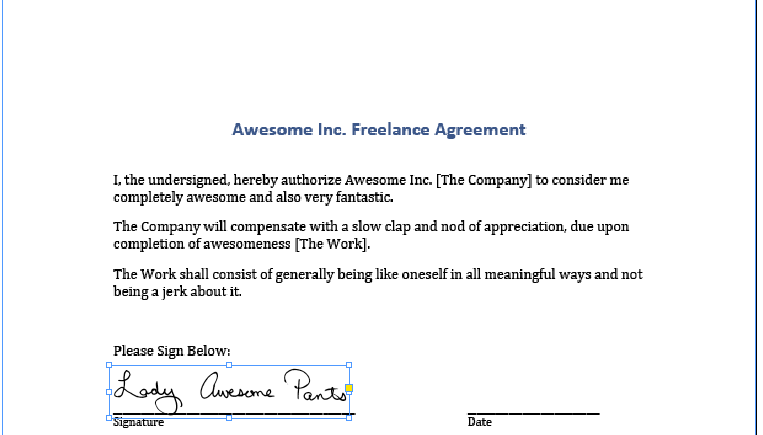
select signature
Select signature


And drag it into place or nudge it with the arrow keys on your keyboard. Even though the black signature is on a white background, if you created a bitmap TIFF file, InDesign will treat any white pixels as transparent, so your descenders can dip below the signature line.
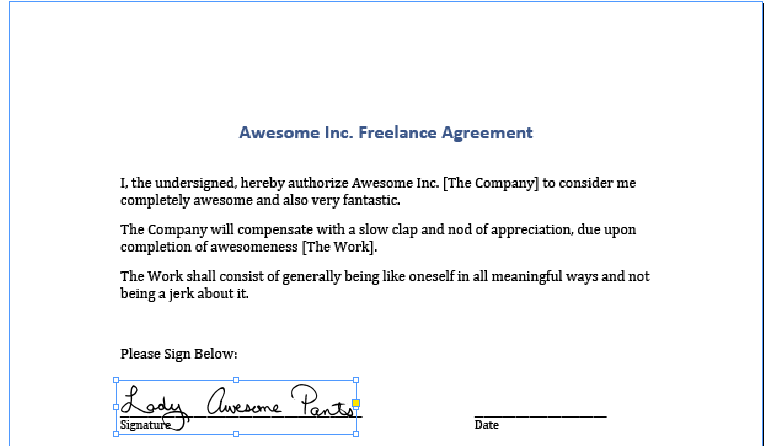
signature in place
The signature in its place


That's pretty much it for adding an image. If that's all you need to do, you can skip ahead to the end, where we make a PDF to send.

If you have text to add to the page, you'll need to select your standard text tool from the toolbar. Use this to draw a box over first space requiring text.
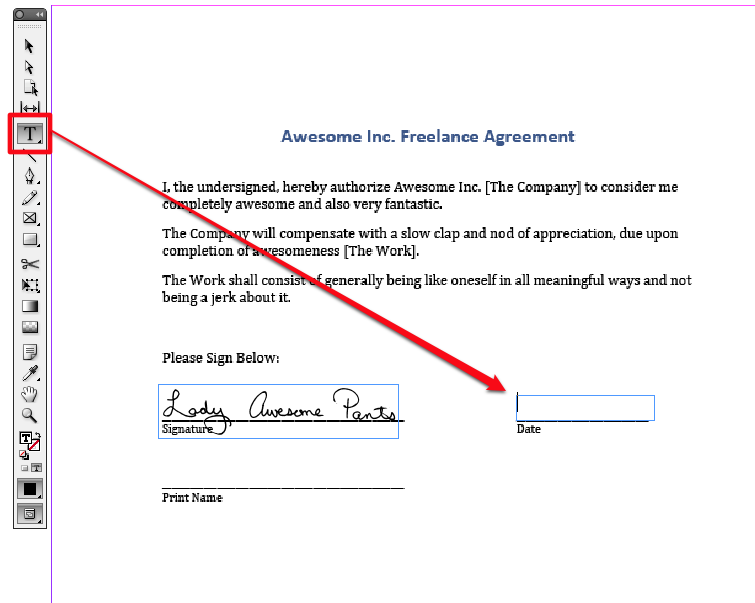
create a box for the date
Use the text tool to create a text frame


Type in the relevant text. If, after typing in the text, the frame is blank or the text cut off and you see a little red plus sign, that means your frame is too small to hold the text. Use your black arrow to resize the frame.

With your text frame still selected, go to OBJECT | TEXT FRAME OPTIONS to modify your text frame.
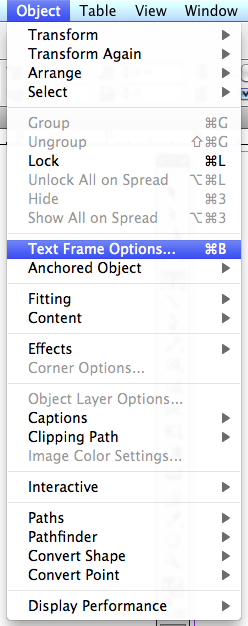
Text frame options
Modify the options for your text frame


The default vertical alignment is TOP. From the drop-down, choose BOTTOM. This step is totally optional but it makes it easier to align items to a visual baseline.
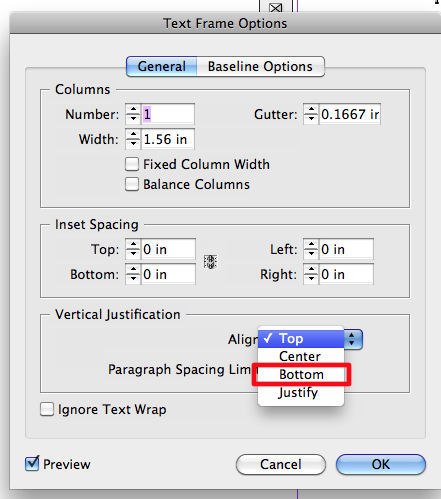
Change the vertical alignment
Set vertical alignment


If you were about to fill out a bajillionty page contract or job application, and you wanted to save yourself a few moments, you could use this opportunity to define the current text frame settings as your default text frame settings. That's a bit out of the scope of this tutorial, but the options for defining object styles are in the Object Styles Palette, which look a little like this.

The vertical alignment change will push your text to the bottom of the text frame. It will look something like this.
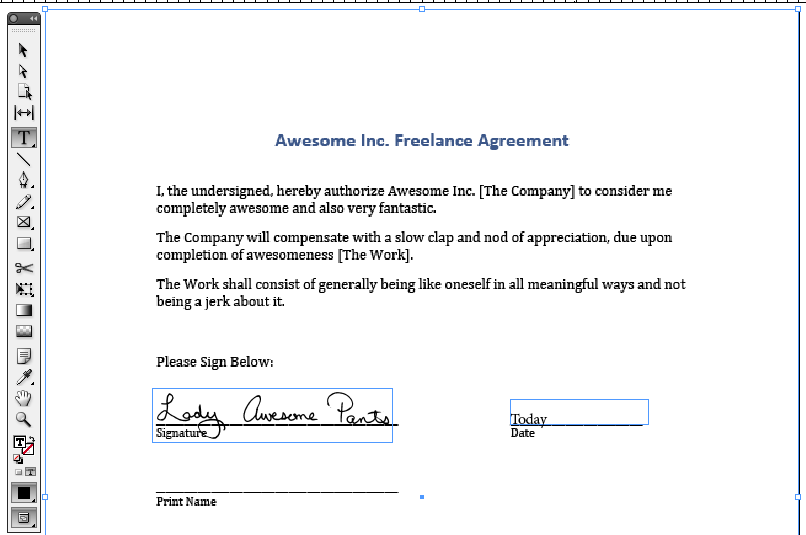
vertical align bottom
The date is aligned to the bottom of the text box


You can nudge the text frame so that it is as far above of the line as you find visually acceptable.
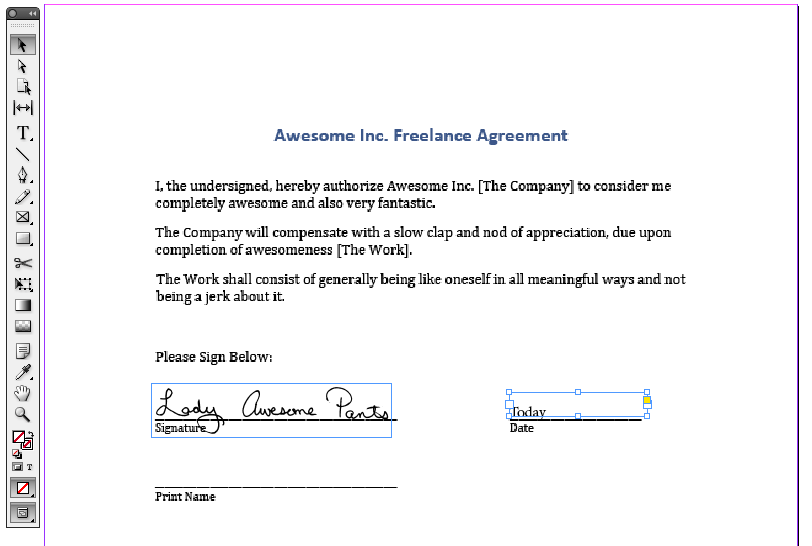
nudge text frame
Nudge text frame into place


To quickly create a second text frame with the same attributes, hold down Option (Mac) or Alt (PC) button and click and drag on the text frame. This will create a copy of the text frame, leaving the original one where it was. Drag or nudge it into its final position.
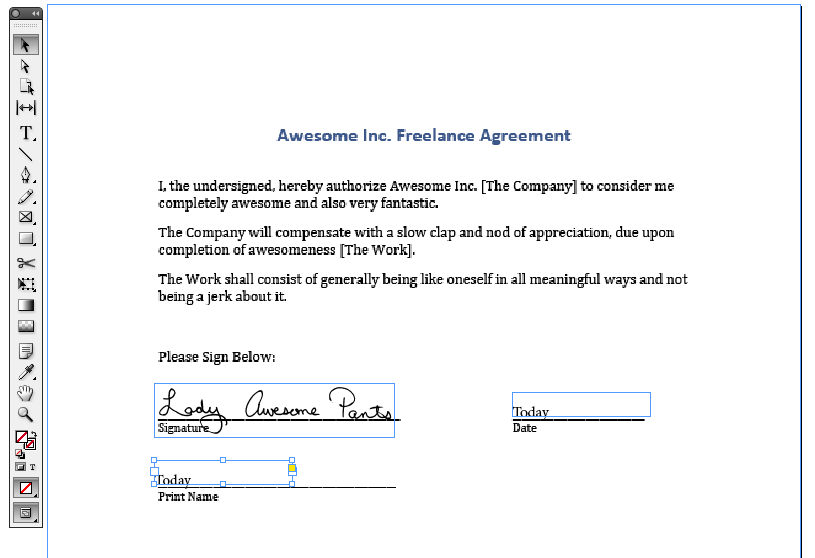
Option/Alt drag the text frame to make a copy.
Create a second text box


Double click on the frame to edit the text or switch to your text tool, and then modify the text.
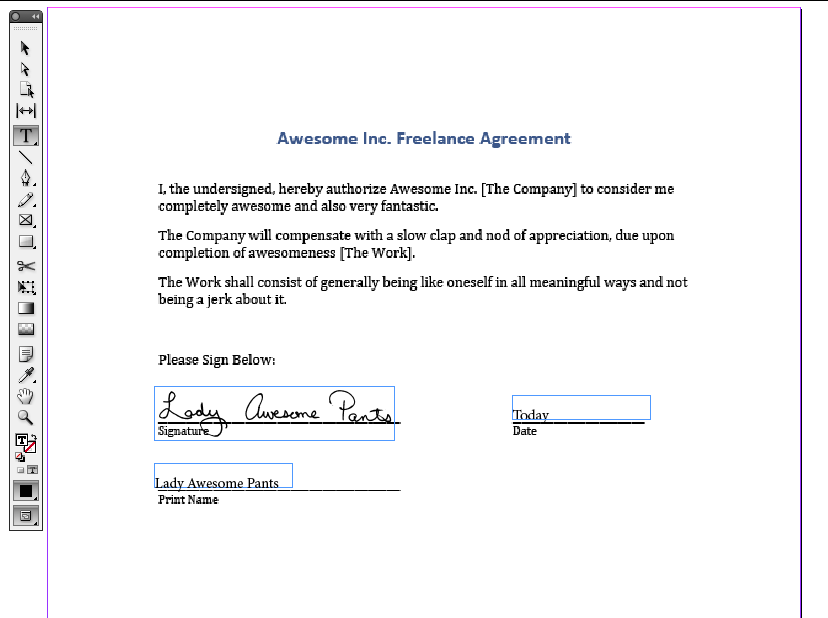
change the text
Update the new text box


Continue in this manner until you've filled out all the applicable information and signed in all the indicated spots.

The only step remaining is to create a PDF. Go to FILE | EXPORT. A dialog box will appear. Choose Adobe PDF (Print) from the Format drop-down list.
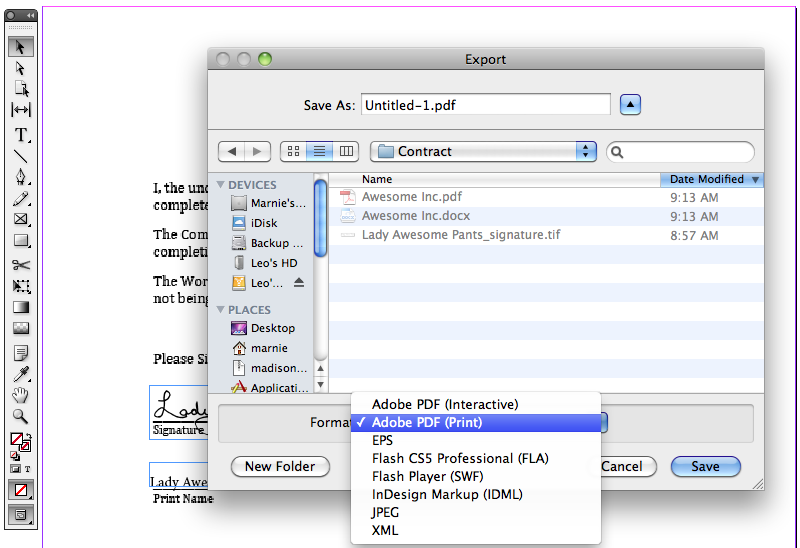
Choose PDF
Choose PDF from the drop-down


Name your PDF and click Save to complete the process.
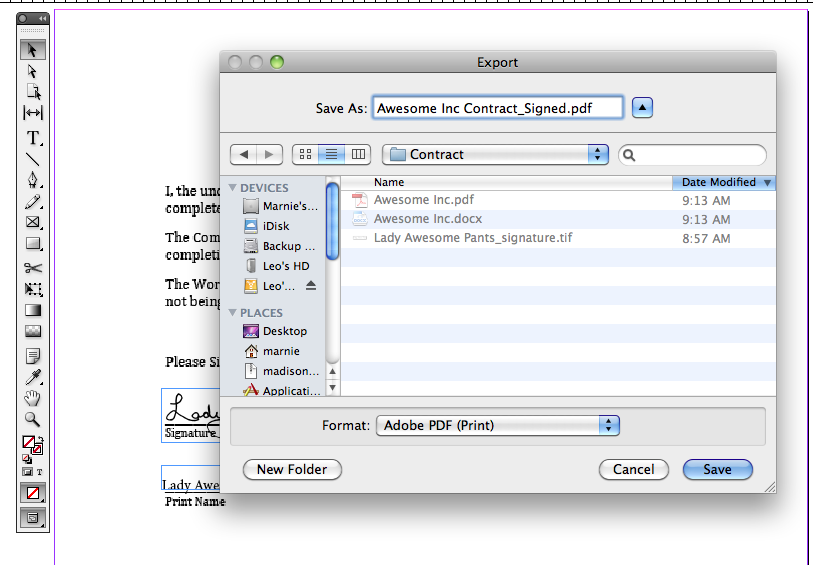
give your pdf a name
Save your PDF


That's it! Your contract is ready to email back and you have a signed digital copy for your records.

I may actually add a part 4 to this 3 part series. Microsoft Word does allow the placement of PDFs and you could do a hybrid of the two methods to sign a PDF in MS Word. This would work well for people who do not wish to invest in buying and/or learning a desktop publishing application.
This is part two of a three part series on adding your signature to digital files. In the first part, we discussed making a TIFF of your signature. In this part, we'll discuss adding your signature to a contract, if it's sent to you as an editable Microsoft Word file.

If you want to play along with the home game, you can download the signature, a sample Microsoft Word contract and a sample PDF contract by clicking the links.

For this step, you'll need:

*I'm using Microsoft Office 2008 on a Mac. This should work in programs like Open Office, Pages, or other word processing programs, but the individual steps my vary. You can refer to your help menu or user manual for more guidance.

Before we get started, let me just say that word processors are called, "word processors" because they are meant to, um, process words. I know, obvious. But the point is that word processors are not layout design tools. They support including images and spreadsheets and flow charts and various and sundry other bells and whistles, but just as you'd want to track your businesses expenses in Excel, not Word, you need to accept that Word manages layout design duty the way Carrot Top manages his face (it ain't pretty.) All this is to say that while Word does an acceptable job of allow you to plop your signature into a document, it's not an ideal solution. Personally, if it's an option, I'd rather save the document as a PDF and use the method I'll be outlining in the third and final portion of this tutorial. But it's good to know these skills, regardless, so I'm covering them here.

Begin by opening your contract in Microsoft Word.

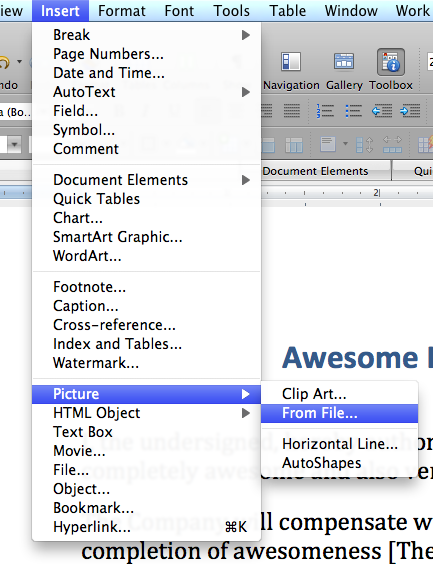
Place your cursor where you'd like to place your signature and go to INSERT | PICTURE | FROM FILE

import image
Insert picture

Navigate to your signature and double click it.

Note: If the image is grayed out, it means the signature is a file format your word processor doesn't support. Word is pretty accommodating, open source alternatives may be more restrictive. If your image file format is not supported in your word processing program, open your signature in your photo editing software and save it as another file format. JPEG should work fine for this purpose.

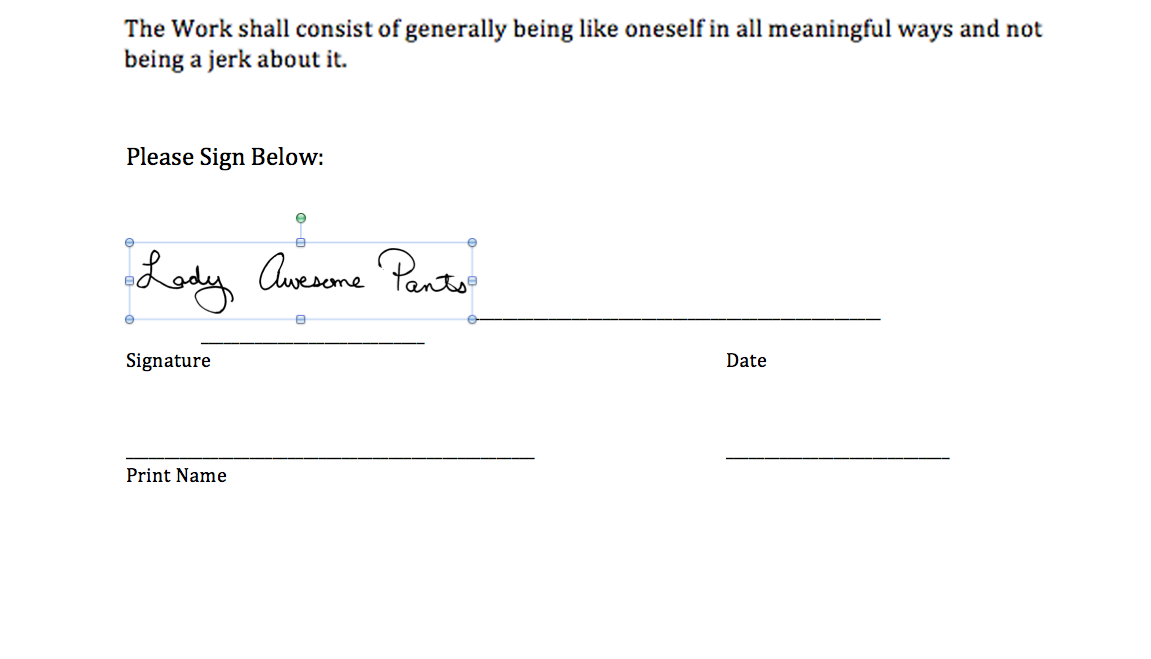
Your image will now appear somewhere near where your cursor was. It has probably caused portions of the page to reflow, move or shift in some aesthetically unpleasing way. Depending on how the page is formatted, it may look acceptable or it may look more like the example below.

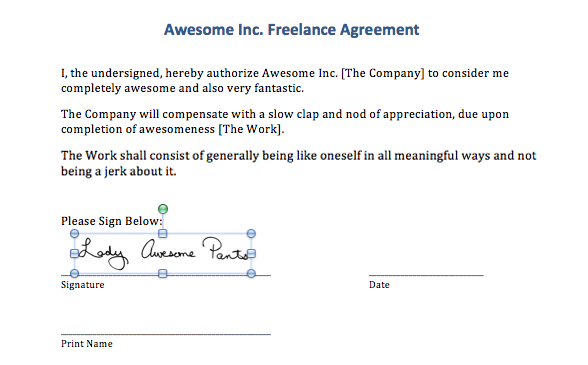
signature on the paeg
Image imported

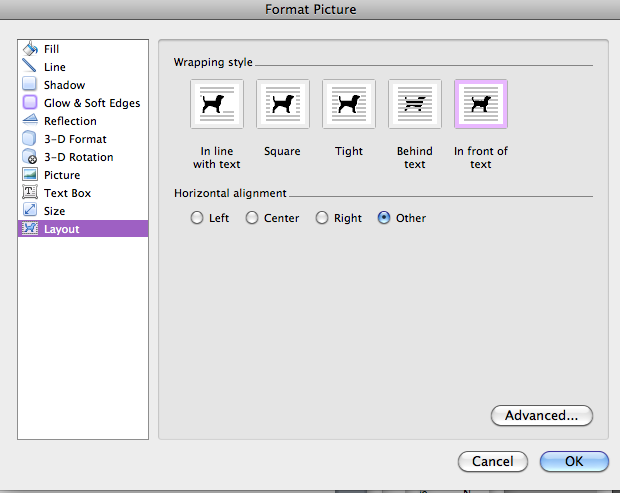
Double click the signature to pull up the Format Picture dialog box. Your dialog box may look different than the image below. Look along the left side and choose the LAYOUT option from the list.

format picture - layout
Format Picture Layout options

From the Wrap Style icons, choose IN FRONT OF TEXT. When you make edits, in the dialog box, you'll see changes happening on the page. Do not be alarmed if your picture jumps around even if it's not in you view at that moment. Click OK to continue.

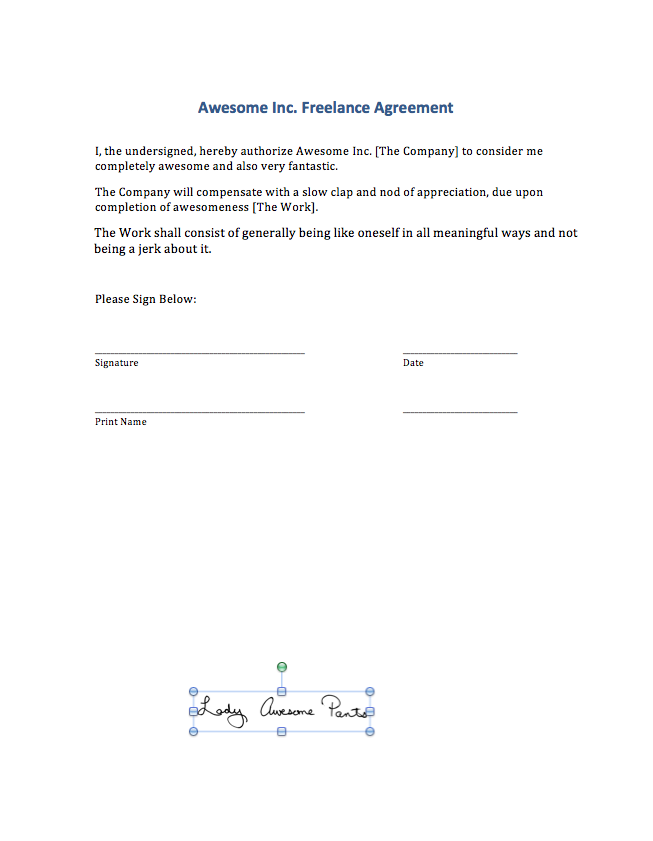
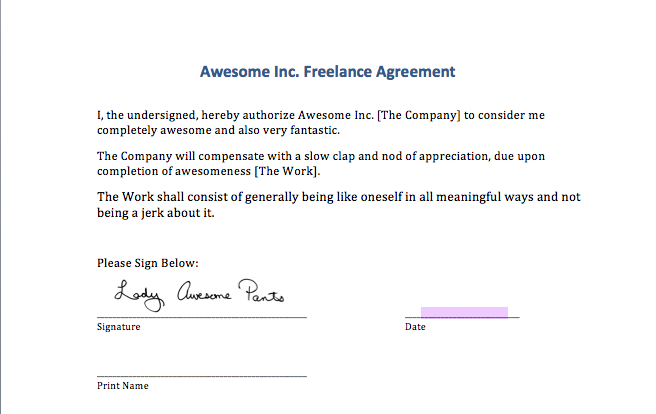
Find your signature on the page. Mine jumped down to the bottom. Remember what I said about Word being a not-good tool for layout? This is a good example. Why changing the wrap should send the image hurtling to the bottom of the page is beyond me, but there it is.

free range signature
Signature on the loose

Move your cursor over the signature, click it and drag it into position. In Word, I place it just above the signature line so that it doesn't overlap. You can drag the corner of the signature, holding down your SHIFT key so it doesn't distort, to adjust its size on the page.

moved and resized
Signature in the right place, at the right size

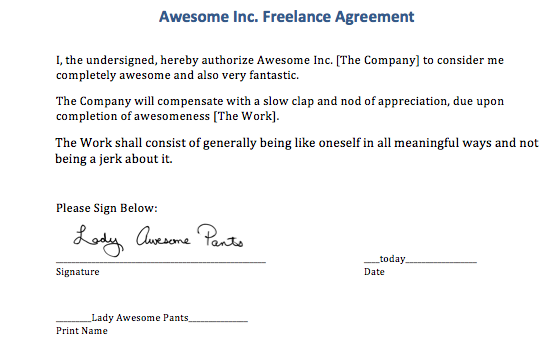
Depending on how your contract is formatted, the underlines may be created by applying an underline style, adding an underline to a tab stop or by typing an underscore repeatedly. I find the last used most often so that's what's in our sample contract, but in any of those cases, you'll probably need to include the date and your name somewhere. Unless someone has made an interactive form, there's really no pretty way to handle this short of reformatting someone else's file so I usually just settle for the"good enough" solution that follows.

Select enough underscore characters to accommodate the date. If you are using a MM/DD/YY type format, you won't need to select many characters. If you are using the FULLMONTH DAY, YEAR format, you may need to select the whole line.

select the line where the date goes
Selected underscores

Type in the date. If you removed too many underscores, you can simply type additional ones in. If you didn't select enough underscores and some have jumped to the next line, just delete them.

Repeat this process for your name.

do the same for your name
Add your name

And that's it!

You can email your contract back as is, or save it as a PDF if you prefer. Personally, I'd rather send a PDF which can be locked so that the signature file cannot be reused. It's not a foolproof plan but handing a high quality picture of your signature off to someone you barely know, just seems a little unwise.

As a freelance designer, I sign a lot of contracts. It's just part of working with businesses on a project by project basis, and about 99% of the time, those contracts come to me as digital files.

I have a fax machine at home, and I could print out my contract, sign it, fax it to the person who needs it, who probably gets their faxes printed out on more paper and then I could wait to get a copy of the version they signed, and file that away, but honestly, that seems wasteful and unnecessarily labor intensive. I'm also partial to storing files digitally so the paper workflow is not ideal. I have enough unsorted clutter in my house.

As a side note, while I'm posting this as a knitwear design tutorial, it really is just a useful thing to know in general. This skill was invaluable when we were buying a house, and again when we refinanced. If you are applying for jobs, filling out contracts, or signing any file you receive digitally, you can use the methods I'll be covering.

In this post, we'll be covering the creation of a reusable image of your signature. Because I'm not completely out of my gourd, I am going to be using a signature of my nom de rien, Lady Awesome Pants, as opposed to my actual real signature, which someone might want to use for nefarious reasons.

In the following posts, we'll discussing using the image to sign your contract.

If you want to play along with the home game, you can download the signature, a sample Microsoft Word contract and a sample PDF contract by clicking the links. You can also download the unretouched scan of the signatures, here.

For this step, you'll need:

  • pen
  • paper
  • scanner or digital camera
  • Adobe Photoshop or photo editing software of choice*

*I'm using Adobe Photoshop CS5 on a Mac. If you are using a different photo editing software, you may need to refer to your user's manual.

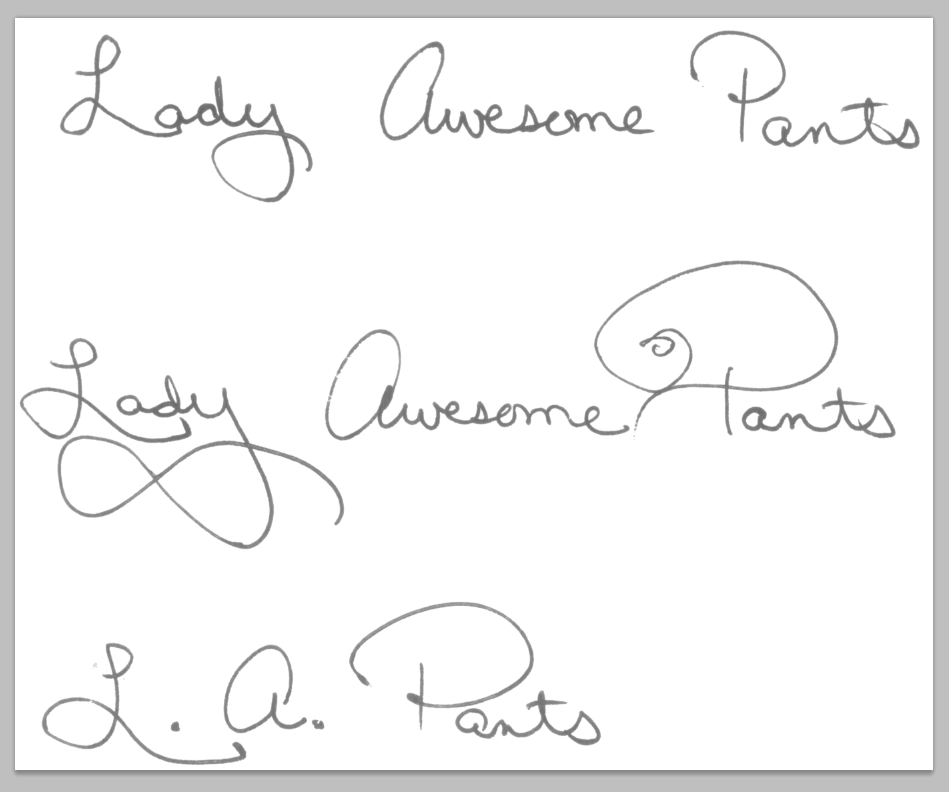
Find yourself a good, medium point, dark (preferably black) ink pen and a clean piece of paper (no lines, no show-through from anything printed on the other side) and write your name and/or initials a bunch of times. Try to do this on a surface that's not too hard, a catalogue under your piece of paper works nicely. Press firmly as you sign. You don't want a light whispy signature, you want something clear and legible.

signature samples
Signature Samples

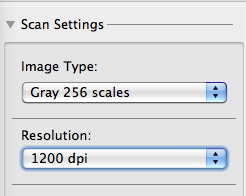
Once you know you have at least a few examples that you like, get ready to scan your page. I usually scan the whole page. Sometimes, it's not until after you've cleaned up the scan, that you can tell which signature will work best. I like to scan at a high resolution, in grayscale, to ensure I get all the detail I need with no unnecessary noise.


Scanning settings

If you don't have a scanner, you can photograph your signatures with a digital camera, just make sure you do so in good, natural light, on a background that won't show through your paper and that the signatures are in focus.

Depending on your scanner, your digital camera, the lighting, and whether or not you fed your Mogwai after midnight, your digital file may be too dark or too light or otherwise somewhere short of perfection.

Note: If you scanned or photographed your signature in color, convert your file to Grayscale by going to IMAGE | MODE | GRAYSCALE before proceeding.

Scan
This raw scan is not living up to its full potential

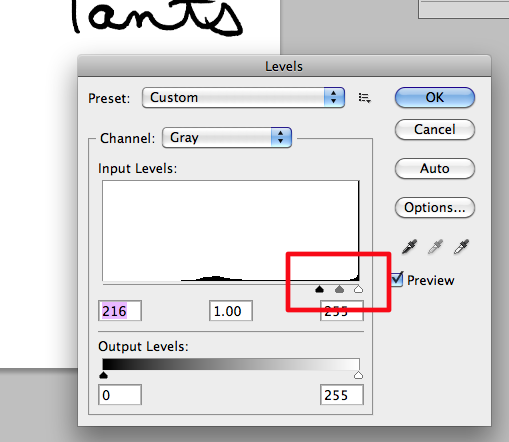
In Photoshop, go to IMAGE | ADJUST | LEVELS

This will bring up a set of sliders that will allow you to clean up your scan. Bring the black triangle as close to the white triangle as possible. That will make everything on the page either pure white or pure black and remove all shades of gray. Play around with moving them more to the left and more to the right. One direction will make your lines appear thicker, the other will make them thinner.

adjust levels
Adjust Levels

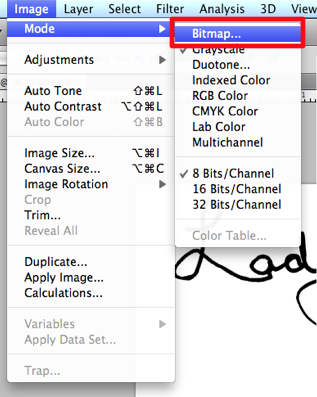
Next we'll convert the mode to Bitmap. Your image must already be grayscale for this option to be available. If it's not grayscale, convert it now. Bitmap files are made up of only black and white pixels, no shades of gray, no color. This is a good format for pixel based logos and line art. Additionally, many programs, like InDesign, Quark and other desktop publishing applications, will view the white pixels in bitmap images as transparent, which can be useful with signatures that are supposed to sit on a line. You'll see how this works in the InDesign portion of this tutorial, to come at a later date.

Go to IMAGE | MODE | BITMAP


Convert image to Bitmap
Change Mode to Bitmap

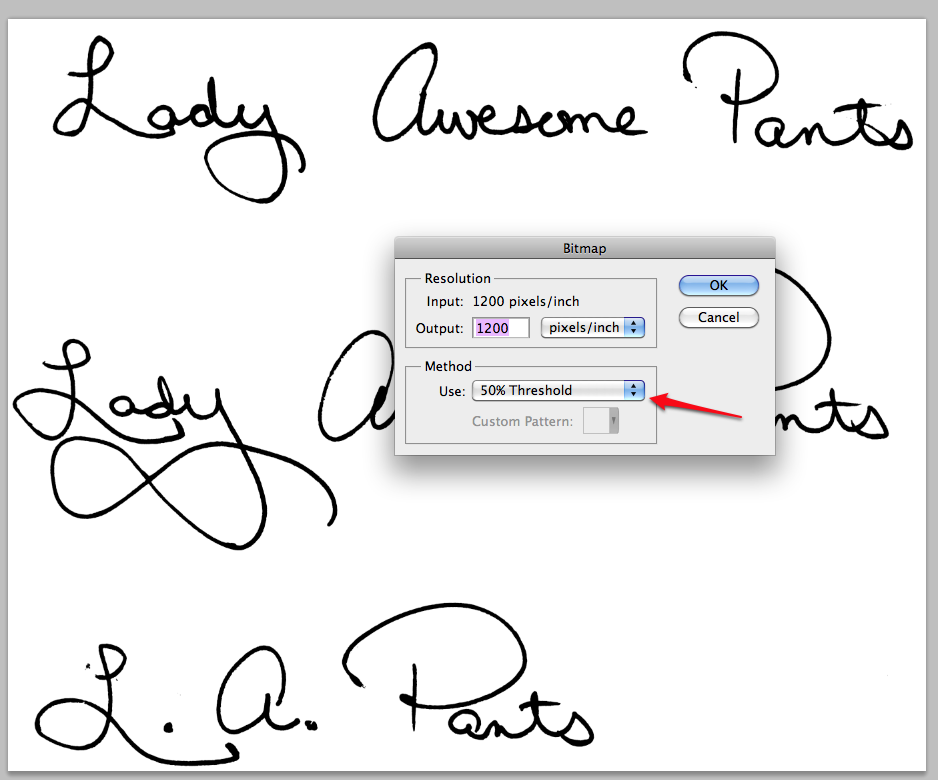
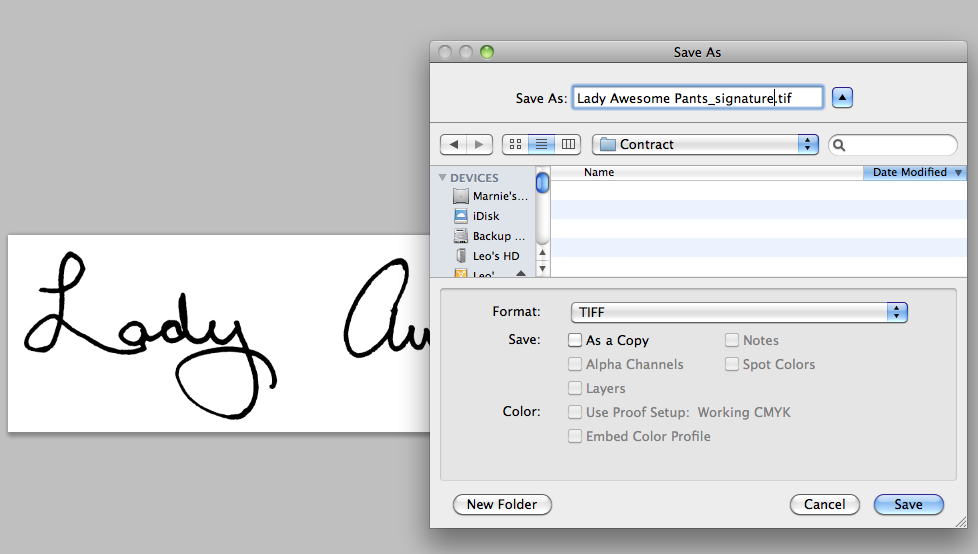
Choose 50% Threshold from the Method drop-down. I like a resolution of about 1200 dpi. I would avoid going below 1000 dpi.

bitmap settings
Settings for conversion to Bitmap

If you adjusted your Levels properly, you won't notice much change in your file. If your signature looks too washed out or too blobby (technical term) after conversation, that means you didn't adjust your Levels slider to be close enough together. Simply undo and adjust your Levels further.

If you are happy with the results, you can crop your image so that you only have your favorite signature visible.

cropped signature
Cropped

Save your file as a TIFF.

Save as tiff

You might be thinking, "But Marnie, what is this TIFF madness of which you speak? Why can't I save it as a JPEG?"

JPEGs do not support the BITMAP format because JPEGs are always, RGB (color) images. So all that work converting to a bitmap, to make a good quality piece of line art, will be lost. It will still work well enough, but if your image software supports Bitmap and TIFF format, that's the way to go.

That's all there is to it. You now have a lovely file of your own signature, that you can use to sign digital files.

In the next tutorial, we'll talk about using the file to sign Microsoft Word documents and in the third and final installment, we'll use this file in InDesign and talk about adding typed text to PDF forms.

Cathedral Windows Hot Pad

| 6 Comments

Cathedral Windows Tutorial_099

In the short time that I've been quilting I've learned enough to know that I have a lot to learn. I'm still really bad at it but I've been obsessively scouring the internet to bolster my skills.

While I've stuck with simple quilts so far, there's one slightly more advanced quilt that always catches my eye, the Cathedral Windows pattern. The first one I ever saw was here (youtube video). Amazing, right? But jeeze o pete, that's a lot of handwork.

Then I found this tutorial on the Moda Bakeshop site and a whole bunch of the handwork was taken out without losing a lot of what makes the pattern appealing to me. I tried the technique and ended up making this and while I liked it, there were a couple of things about the pattern I didn't love (and I really needed to work on my top stitching).

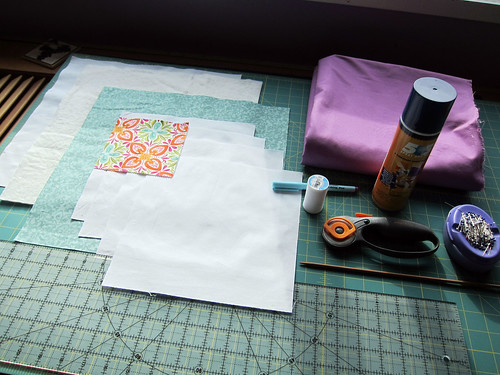
So based on the techniques I saw online and a few things I wanted to change slightly, I came up with this variation. The one I'm demoing, (shown above) doesn't cut off the edges of the windows around the edge and can be adapted to any size you like. It also has batting behind it, for a little more dimensionality. This could be easily adapted to a table runner, lap quilt or wall hanging. For bags and pillows, you could leave the backing off, if you wanted to.

Supplies

Cathedral Windows Tutorial_001

Fabric

  • 1 - 14" x 14" backing piece (shown in white)
  • 1 - 14" x 14" piece of batting. If you plan to use this as a hot pad, use 100% cotton
  • 1 - 14" x 14" piece of border fabric (shown in Moda Cotton Blossoms 55005)
  • 4 - 9.5" x 9.5" for windows (shown in white)
  • 1 - 5" x 5" or 4 - 2.5" x 2.5" square(s) for window panes (shown in Moda Terrain by Kate Spain in 27092-13)
  • Binding fabric (Shown in...heck if I know)

Other supplies

  • Sewing machine
  • Thread
  • Rotary cutter/ruler/mat
  • Marking tools
  • Pins
  • Hand sewing needle
  • Point turner
  • Iron and ironing surface
  • Hand sewing needle

Optional

  • Basting glue
  • Water spray bottle
  • Spray starch
  • Scotch Guard

All images may be clicked to view them full size.

Share this page

About this Archive

This page is an archive of recent entries in the tutorial category.

bellocq is the previous category.

hiking is the next category.

Find recent content on the main index or look in the archives to find all content.

August 2016

S M T W T F S
  1 2 3 4 5 6
7 8 9 10 11 12 13
14 15 16 17 18 19 20
21 22 23 24 25 26 27
28 29 30 31      

Find Me Here

  • rss
  • facebook
  • twitter
  • flickr
  • goodreads
  • google
  • linkedin
  • pinterest
  • ravelry
  • youtube

Featured Patterns