Creating Schematics in Illustrator
Most images can be clicked for a larger view.
I get a surprisingly large number of questions about schematics so I thought it was time to cover that topic here.
This tutorial is meant to give you some basic skills for creating schematics in Adobe Illustrator or a similar vector based application. There are countless ways to create schematics, this is just how I like to do it. Hopefully, even if you don't have Illustrator, some of my suggestions will be useful for you if you've struggled with making your own schematics. These instructions are written by a Mac user and I am using Illustrator CS2 and CS3. I will try to provide appropriate alternatives for PC in brackets [], but no promises that they will be 100% accurate. Refer to your Help menu, if need be, for PC or older versions of Illustrator.
The first step, of course, is to open a blank document. (Once you've made a few schematics you like, you can start using the ones you've made as a template, which will save oodles of time.) I like to build the schematic to the approximate scale of the sample I am or will be knitting.
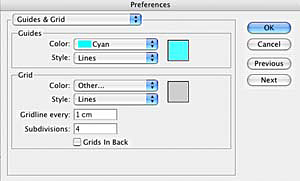
Once you have a blank document, go to the Illustrator Preferences [Options] and choose Guides and Grids.
You can use whatever you like for measurements, but I find it useful to start with a centimeter per inch relationship. I set up grid lines every centimeter with 4 subdivisions each, which allow me to get quarter inch increments in my scaled down schematic.
To make your grid visible, type CMND+' [CTRL+']

