Copyright Marnie MacLean 2004
Click on Images for Larger View

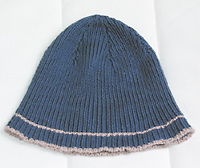
Titled for a nearby beach, the Pismo hat is created to be light and comfortable, perfect for Southern California's weather. While I've made a good many hats for Leo and can easily crank out a mid to bulky weight hat for him in a weekend that he'll enjoy and wear on chilly evenings, his most worn hats are those that are ribbed and machine knit from thread weight yarn. Well, there's no way I'm going to be able to produce a fabric as light as those hats, but I knew I could make him something very close and exactly to his specifications. The hat can be worked in the round with no seams or flat with a single seam up the back. Neither is hard, but the seamless version will require double pointed needles once you begin the decreases. If you are willing to spend the time to work many rounds of 1x1 ribbing, the end result will be a hat that can take you through most seasons and many occasions.
Supplies
1 skein of Dalegarn Stork in main color of choice.
Small amount of Dalegarn Stork in contrasting color
Waste yarn for tubular cast-on (optional)
US #2 12" circular needles (seamless version)
5 US #2 dpns (seamless version)
US #2 straight needles (seamed version)
7 stitch markers (SM)
Tapestry needles
Gauge
In 1x1 ribbing
33 stitches x 44 rows = 4"
Notes on working hat
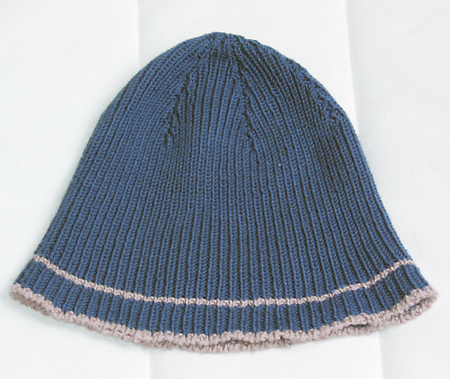
When working ribbing, you can produce clean stripes by knitting the first row of a new color change. If you were to work the first row in 1x1 rib, you would see a broken color transition for each purl stitch.
When working in the round, you should consider a "jogless" stripe technique. I used this method, which works beautifully.
 Hat (seamless version)

Using contrasting color yarn:
CO 150 stitches using a tubular cast on or cast on of choice.
Place a stitch marker between the first and last stitch to indicate the end
of each round.
Work 1x1 rib for a total of 3 rows in contrasting color.
Clip yarn and begin working in main color, knitting the first round, for a clean transition and then working 1x1 rib for the remainder of the rounds.
Work in main color yarn for a total of 9 rounds.
Clip yarn and work a total of 2 rounds of the contrasting yarn. Remember to knit the first of the two rounds to produce a clean transition between colors.
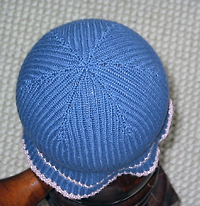
Clip yarn, one last time and switch back to the main color. Knit the first round and then work every round in 1x1 rib until the hat has reached a total length of 5 inches (about 55 rows from cast-on)
There will be a total of 6 decrease stitch markers needed. Count to 13 stitches from the beginning of the round and place a stitch marker between the 13th and 14th stitch. Place another stitch marker at each 25 stitch interval from there. I suggest using a noticeably different stitch marker for the end of the round, to distinguish it from the others.
Work in 1x1 ribbing to within 2 stitches of first decrease stitch marker. Keeping the k1, p1 pattern, work the next two stitches together in a left leaning decrease. For instance, if you have started this round with a knit stitch, you will work:
K1, p1, k1, p1, k1, p1, k1, p1, k1, p1, k1 (total of 11 stitches)
Your next stitch would be a p1, so ssp the two stitches together.
Slip the stitch marker and make a right leaning decrease in a manner to keep the 1x1 pattern. In this case, you would work a k2tog. This sounds complicated but the premise is simple, you will work a decrease on either side of the stitch marker, making the decreases lean towards the stitch marker and retaining the 1x1 ribbing pattern without interruption.
Work to within 2 stitches of the next stitch marker, and work a left leaning decrease (in this case, ssk), slip the stitch marker, work a right leaning decrease (in this case, p2tog)
Continue around maintaining the 1x1 ribbing and working each decrease so it leans towards the closest stitch marker. Note that the stitch marker indicating the end of the round should not have any decreases associate with it.
*Work 3 rounds in straight k1 p1 ribbing.
The next round is worked in the same manner as the decrease row above. Work in 1 x 1 ribbing to within 2 stitches of the stitch marker. Work a decrease on both sides of the stitch marker, retaining the 1x1 ribbing pattern. Repeat at each stitch marker until you reach the one indicating the end of the round. *
Work from * to * until you are down to 6 stitches.
Cut yarn, pull through all remaining stitches with a tapestry needle.
Weave in all ends
 Hat (seamed version)
Cast on 151 stitches on US #2 straight needles
Work exactly as for the seamless version, but work flat, back and forth. Note that there is an additional stitch at the end of the row for seaming.
When you have completed the hat, close the back seam with a mattress stitch.
Thank you so much for your interest in my patterns. Most of my free patterns were efforts to learn to design and do not conform to industry standards for sizing or terminology. Enough people continue to knit from these designs that I am happy to leave these patterns up for people to use but I cannot offer any amendments or substantial support for them.
As with all my patterns, you are welcome to use these patterns for your own personal, non-commercial or charitable use. If you wish to sell items made from these patterns or teach classes using my patterns, please contact me. Please do not distribute this pattern in print or electronically or post this pattern to your own site or publication. If you wish to share this pattern, please send the person a link to my site.