Copyright Marnie MacLean 2003
Click on Images for Larger View
 "...
Year after year beheld the silent toil
"...
Year after year beheld the silent toil
That spread his lustrous coil;
Still, as the spiral grew,
He left the past year's dwelling for the new,
Stole with soft step its shining archway through,
Built up its idle door,
Stretched in his last-found home, and knew the old no more...."
The
Chambered Nautilus
Oliver Wendell Holmes
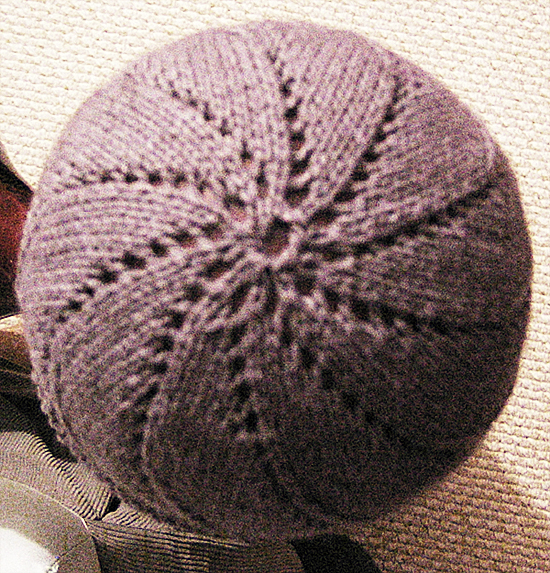
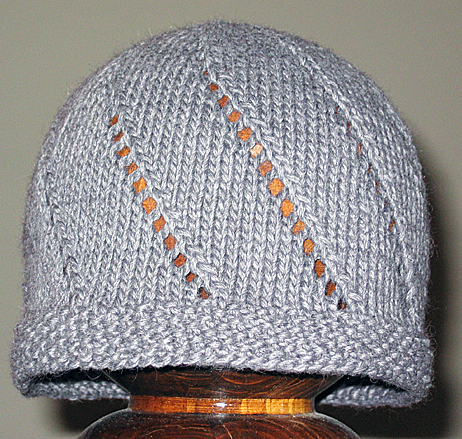
This hat, in two forms, is worked from the top down. Her version (in gray with eyelets) is worked in the round to avoid an unsightly seam that may migrate to the side or front. The man's version (in blue with no eyelets) can be worked flat or in the round. Both produce a nifty spiral pattern at the crown. Her version highlights this effect with eyelets that are worked the entire length of the hat. His version has a folded hem, while Hers uses a seed stitch band to keep the hat from rolling.
Maybe more than any other item of clothing other than undergarments, hats require soft yarns that don't itch and irritate. Paco is a cotton/alpaca mix that is so versatile, you may not be able to stop with a hat.
Supplies
1-1.5 skein of PACO in
color of choice
Several yards of PACO in
contrasting color of choice (his version, only)
1 set of #6 double pointed needles (her version)
1 set of #6 12"-16" circular needles (his version, optional for her version)
Stitch marker (her version only)
Tapestry needle
Yarn substitution
Paco is a worsted weight cotton/alpaca blend. Any worsted weight yarn for which you are able to obtain gauge, should work well.
Gauge
16 stitches x 22 rows = 4"
Stitches used
Knit (K)
Purl (P)
Stockinette Stitch (STst)
Increase by knitting in front and back loop (Inc)
Make one with a yarn over (YO)
Knit 2 together
(K2tog)
Seed St (SS)
His Version (worked flat)
Please excuse the picture, the hat is far too large for me but my model has been under the weather. This hat can be worked in the round, simply remove the 2 extra stitch for selvage and work on double pointed needles. Directions for adult size S (M/L) [Width 12.5" (13.75/15").] For best results, measure recipient's favorite hat length, or measure from crown of head to top of eyebrows.
CO 12
Row 1: K
Row 2: and all even rows: Purl
Row 3: K1 *K1, Inc 1* to last st, K1
Row 5: K1 *K2, Inc 1* to last st, K1
Row 7: K1 *K3, Inc 1* to last st, K1
 Row 9: K1 *K4, Inc 1* to last st, K1
Repeat in this manner adding one more
stitch before each Inc until you have a total of 100 (110, 120) stitches.
Work in STst to within 0.75" of desired
total length of hat. If you don't know the desired length, work to about
8" making sure that the last row is
a WRONG SIDE row.
Work 3 rows of contrasting color, switch back to main color
Work one row
Purl one row (this will be the point where you fold
the hat to make the hem.
Work
5 more rows in STst
DO NOT BIND OFF.
Folding hat along purl row, whip stitch or kitchner stitch
the final row of stitches to the inside of the hat to form a hem.
With tapestry needle, sew up back seam from bottom to top. Run thread through
the CO stitches and close up the small hole at the top.
Weave in any ends.
Her Hat (worked in the round)
Since the eyelets are worked the entire length of the hat, it's best to work this hat in the round. I prefer my hats a little shorter than some, but the directions allow you to easily adapt the length. This hat can even be tried on as you go. While the eyelets are really easy, it's entirely possible that a mistake could be made in the process. You'd be surprised how hard it can be to rip out and fix even the most simple lace patterns. Read about "life-lines" in the pattern for Hooray For Me Gloves. I suggest throwing a life-line in every 5-10 rows depending on your skill level.
Hat written for size S (M/L) [Width 11.25" (12.5/13.75)]
 CO
10 and distribute over 3 or 4 double pointed needles
CO
10 and distribute over 3 or 4 double pointed needles
Row 1: K
Row 2: and all even rows: K
Row 3: *K1, YO* around
Row 5: *K2, YO* around
Row 7: *K3, YO* around
Row 9: *K4, YO* around
Repeat in this manner adding one more stitch before each Inc until you have
a total of 90 (100, 110) stitches.
If you would like, you can move the hat to small circumference circular needles
at this point.
Row 1: *K2tog, K7(8, 9), YO* around
Row 2: K
Repeat rows 1 & 2 until hat is within an inch of desired total length.
(If
in
doubt,
work about 6.5 inches)
Work 1" of SS
BO
Weave in any ends, and if you'd like, close up the hole at the top of the hat.
Thank you so much for your interest in my patterns. Most of my free patterns were efforts to learn to design and do not conform to industry standards for sizing or terminology. Enough people continue to knit from these designs that I am happy to leave these patterns up for people to use but I cannot offer any amendments or substantial support for them.
As with all my patterns, you are welcome to use these patterns for your own personal, non-commercial or charitable use. If you wish to sell items made from these patterns or teach classes using my patterns, please contact me. Please do not distribute this pattern in print or electronically or post this pattern to your own site or publication. If you wish to share this pattern, please send the person a link to my site.