Copyright Marnie MacLean 2004
Click on Images for Larger View
Gauge:
13st x 23 rows = 4"
Supplies:
- #10.5 Straight or Circular needles
- 1 skein of Homespun in Main Color (MC) - Black
- 1 skein of Homespun in Contrasting Color (CC) - Green
- Tapestry needle
Stitches used:
Knit
- 1 x 1 rib
- stockinette st (STst)
Hat
CO 65 with MC (black)
4 rows of 1x1 ribbing
All remaining rows will be worked in STst
2 rows
*Switch to CC (green)
4 rows
Switch to MC
8 rows*
 Repeat from * to * one more time
Switch to CC
4 rows
Switch to MC
5 rows
BO
You now have a rectangle about 20" wide by 7" tall. See image at right. With 4 MC stripes and 3 CC stripes.
Seaming
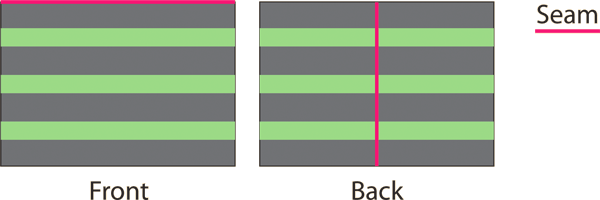 Referring
to image at left, sew short ends together. Center this seam in back and sew
across top of hat. You now have a rectangle that is about 10" wide by 7" tall.
Referring
to image at left, sew short ends together. Center this seam in back and sew
across top of hat. You now have a rectangle that is about 10" wide by 7" tall.
Tassels
Hold CC (green) in hand and wrap yarn around length of forearm (from hand to elbow) 35 times.
Do the same with MC (black) 15 times.
Cut these length of yarn at both ends (In half, then in half again).
Cut a very long length of MC and tie around the center of this wad of yarn. Knot and wrap this piece of yarn several more times around wad and knot again. You want this to be secure.
Use this length of yarn to attach tassel to one top corner of hat. Make sure you sew this on very tightly, then, using yarn needle, bring tails through center of tassel and trim to length to match the rest of the ends.
Repeat this process again for the second tassel.
Final Finishing
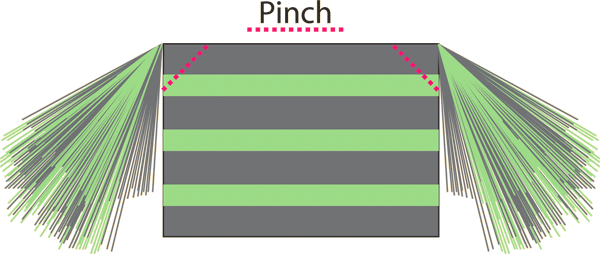 This
step is optional. I felt like my hat didn't stand up straight enough so I folded
over the top corners of the hat which not only brought the tassels
up higher but also added support to these very fluffy accents.
This
step is optional. I felt like my hat didn't stand up straight enough so I folded
over the top corners of the hat which not only brought the tassels
up higher but also added support to these very fluffy accents.
Start by pinching from the top seam to the side edge as shown in the image at right. You are pinching in such a way that you are flattening the corner from the TOP of the hat. If your corner flaps to the front or back of the hat you are doing it wrong.
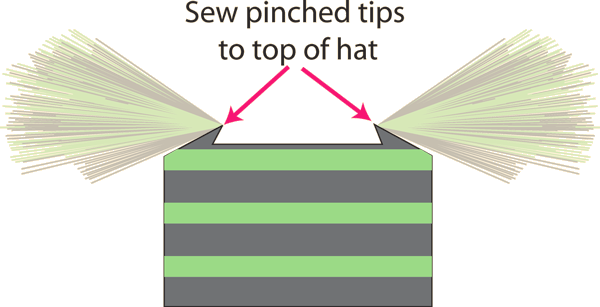
Take these pinched edges and sew them to the top seam. This really strengthens the hat and makes it all the cuter, in my opinion.
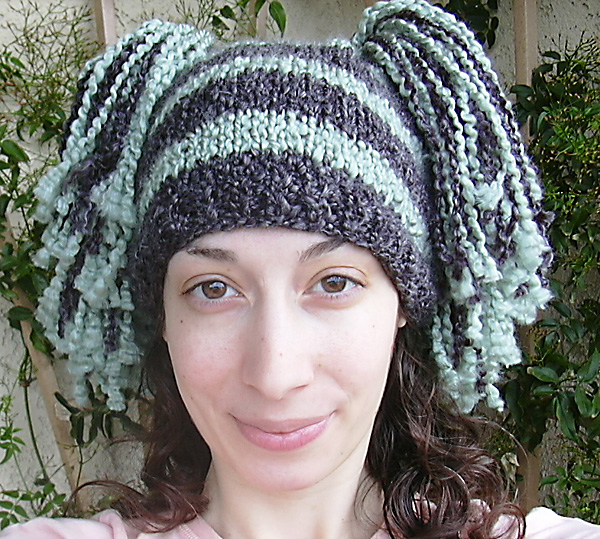
Once the hat is constructed you can trim the tassels as needed. Over time,
the homespun will unravel, producing a poofy look that I think will be just
as cute. If this is really not appealing to you, though, then you may want
to try this with a different yarn.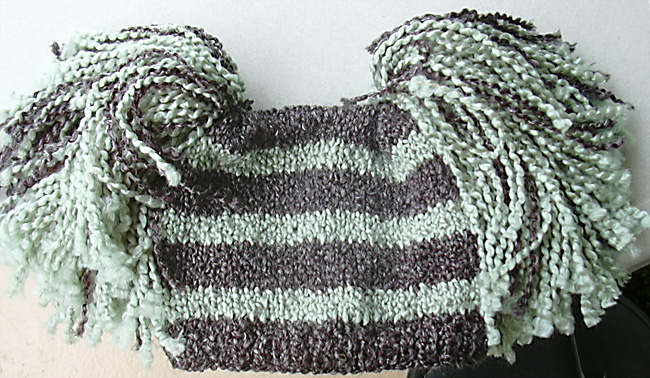
Thank you so much for your interest in my patterns. Most of my free patterns were efforts to learn to design and do not conform to industry standards for sizing or terminology. Enough people continue to knit from these designs that I am happy to leave these patterns up for people to use but I cannot offer any amendments or substantial support for them.
As with all my patterns, you are welcome to use these patterns for your own personal, non-commercial or charitable use. If you wish to sell items made from these patterns or teach classes using my patterns, please contact me. Please do not distribute this pattern in print or electronically or post this pattern to your own site or publication. If you wish to share this pattern, please send the person a link to my site.