 Charts can seem intimidating, but actually give you a great amount of flexibility. You can work any portion from the top down, bottom up, in the round, or in separate pieces. I'll outline my method for creating the piece but you should feel free to go your own route.
Make sure you read through the end section that covers the final lace treatment. Small darts are placed at the shoulder seams to get the lace to sit just right. If you are really ambitious, you could acheive the same effect with short rows.
Supplies
- 650 [700, 800, 900] yards of Paco yarn
- US #7 Circular needles (24" length)
- Stitch Markers
- Tapestry needle
- Blocking supplies
Yarn Substitution
Paco is about a worsted weight blend of alpaca and cotton. Any smooth, tightly spun wool blend or yarn with some memory and/or natural stretch, should suffice. I would recommend a yarn like Aurora 8 or Rowan Calmer, depending on your climate and preference.
Gauge
18 stitches x 26 rows = 4" in STst
Sizes
S | M | LG | XL | |
| Bust | 34.25 | 37.5 | 39.25 | 42.75 |
| Waist | 26.5 | 29 | 31 | 34.5 |
| Hips | 37.5 | 41 | 43 | 46.5 |
| Length | 26 | 26.5 | 27.5 | 28.5 |
Graphs
Download the graphs for you size as well as the graph for the lace.
X Large:
Top | Bottom | Sleeve
Understanding the Charts
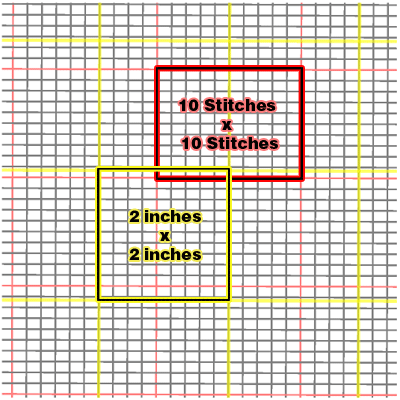 All the pieces (except the lace) appear on a grid like the one shown to the right. The black lines indicate individual stitches, the red lines indicate 10 stitch intervals and the yellow lines indicate 2 inch intervals. With this information, you can easily adapt the pattern to your own knitting style and body shape. For instance, if your bust and hips fit the medium grid but your waist is wider, you can use the 2" interval lines to redraw the silhouette of the pieces to better suit your figure. Once you have determined how wide the waist should be, you can follow along the stitch graph to determine the new pattern. When I work from charts (which I do for all my own patterns) I like to keep a crib sheet of all the rows where I must make an increase or decrease.
Row | |
1 | d |
8 | d |
12 | d |
19 | d |
21 | d |
32 | i |
38 | i |
44 | i |
52 | i |
Let's say I have to decrease on rows 1, 8, 12, 19, and 21, then work straight for 10 rows and then increase on rows 32, 38, 44, and 52. I will make a list to the left.
When I get to a point where I'm also decreasing or increasing for a neckline, I add another column so I can track both the edges and the neckline shaping.
I keep the large chart at hand for a shape and progress reference and refer to my cheat sheet each time I change my row counter.
This process may seam more time consuming at first, but I think it allows the knitting to go more smoothly and gives you more options for customizing your project.
The Pieces
For all patterns, you should get three graphs that look like the illustrations below. You'll notice that I've labeled each piece and indicated where the ribbing goes with dots.
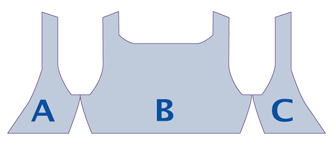 |
TopThese pieces make up the top of the main portion of the sweater. All of the pieces are worked in STst and the lace is attached later. I worked these piece from the bottom up, as one continuous piece from A to B to C up to the armscye, then finished individually. You can work as separated pieces and sew together later. |
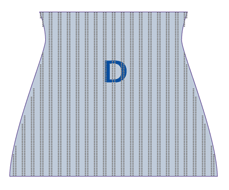 |
BottomThis entire section is repeated twice, once for the front and once for the back. I chose to work this section from the top down, in the round, working shaping on each side of the stitch markers that separated the front from the back. You may choose to work the front and back separately and sew together later. |
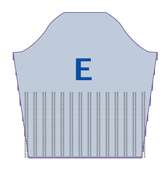 |
SleeveThe sleeve can be worked bottom up or top down. The ribbing extends from the hem of the sleeve up to the height of the empire waist. Once that point is reached, the rest is worked in STst. |
OK, Let's Knit Already
As I've said, I am outlining how I made this piece, but you should feel free to adapt the pattern to suit your style.
Top
Begin by casting on for pieces A B and C using a provisional cast on. Place a stitch marker between each piece. Refer to your "Top" chart knitting back and forth across all pieces until you reach the armscye. Do not knit these pieces in the round, pieces A and C should not be joined, but instead, should remain open. When you reach the arm, use separate balls of yarn to knit each piece to the shoulder seam. use a three needle BO to join front shoulder stitches to back shoulder stitches. Laid flat and folded along the side seams, you should find that the front two pieces do not meet at the center front, instead there is a 12 stitch gap which will be filled by the lace.
Lightly block the pieces.
You can try on the top section as it is, keeping in mind that the lace will cover about 3 additional inches on each side.
Sleeve
Cast on and knit each sleeve from the bottom up referring to the sleeve chart. Remember to work the lower portion in K2, P2 ribbing.
Block lightly
Sew the sides of the sleeve together up to the sleeve cap. Sew the sleeve into place on the top.
Lace
Using a provisional cast on, cast on 17 stitches and work lace according to the chart. Since some people have trouble with lace charts, I'm also providing those in verbose format, below:
Regular
 Row 1: K3, yo, p2tog, yo, p2tog, yo, k1 tbl, k2tog, p1, yb, sl 1, k1, psso, k1 tbl, yo, k3
Row 2: K3, p3, k1, p3, k2, yo, p2tog, yo, p2tog, k1
Row 3: K3, yo, p2tog, yo, p2tog, yo, k1 tbl, k2tog, p1, yb, sl 1, k1, psso, k1 tbl, yo, k3
Row 4: K3, p3, k1, p3, k2, yo, p2tog, yo, p2tog, k1
Row 5: K3, yo, p2tog, yo, p2tog, yo, k1 tbl, yo, k2tog, p1, yb, sl 1, k1, psso, yo, k4 (18)
Row 6: K4, p2, k1, p4, k2, yo, p2tog, yo, p2tog, k1
Row 7: K3, yo, p2tog, yo, p2tog, yo, k1 tbl, k1, k1 tbl, yo, sl 1, k2tog, psso, yo, k5 (19)
Row 8: K5, p7, k2, yo, p2tog, yo, p2tog, k1
Row 9: K3, yo, p2tog, yo, p2tog, yo, k1 tbl, k3, k1 tbl, yo, k7 (21)
Row 10: BO 4, k2, p7, k2, yo, p2tog, yo, p2tog, k1 (17)
Reverse
Row 1: K3, yo, k1 tbl, sl 1, k1, psso, p1, yb, k2tog, k1 tbl, yo, p2tog, yo, p2tog, yo, k3
Row 2: K1, p2tog, yo, p2tog, yo, k2, p3, k1, p3, k3
Row 3: K3, yo, k1 tbl, sl 1, k1, psso, p1, yb, k2tog, k1 tbl, yo, p2tog, yo, p2tog, yo, k3
Row 4: K1, p2tog, yo, p2tog, yo, k2, p3, k1, p3, k3
Row 5: K4, yo, sl 1, k1, psso, yf, p1, k2tog, yo, k1 tbl, yo, p2tog, yo, p2 tog, yo k3 (18)
Row 6: K1, p2tog, yo, p2tog, yo, k2, p4, k1, p2, k4
Row 7: K5, yo, sl1, k2tog, psso, yo, k1 tbl, k1, k1 tbl, yo, p2tog, yo, p2tog, yo k3 (19)
Row 8: K1, p2tog, yo, p2tog, yo, k2, p7, k5
Row 9: K7, yo, k1 tbl, k3, k1 tbl, yo, p2tog, yo, p2tog, yo, k3 (21)
Row 10: K1, p2tog, yo, p2tog, yo, k2, p7, k7
Row 11: BO 4, K2, yo, k1 tbl, sl 1, k1, psso, p1, yb, k2tog, k1 tbl, yo, p2tog, yo, p2tog, yo, k3
For reverse, work rows 1-11 the first repeat, then 2-11 for all subsequent repeats.
Work 13 [13, 14, 14] repeats of the first lace pattern or number of repeats to fit from center back to center front of neckline. Do not bind off. Move the remaining stitches to a stitch holder. (17 stitches)
Remove provisional CO for lace and work the second lace pattern for the same number of repeats. Do not bind off. Move the remaining stitches to a stitch holder. (17 stitches)
Sew the lace to the top along the entire neckline. Since both sides of the lace are not bound off, you can easily add or remove additional repeats if you need to.
Bottom
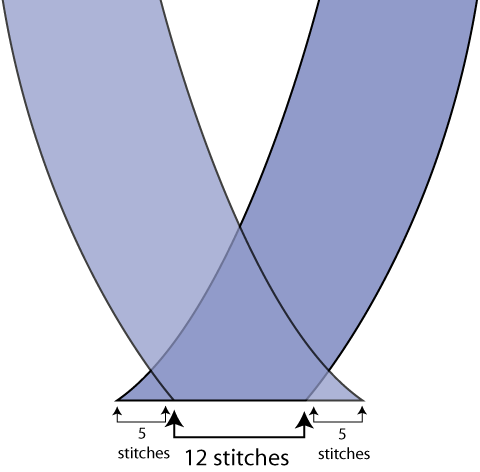 The piece is nearly complete. You now have the entire top with a provisional CO at the empire waist. You also have sewn the lace to the top and the stitches are on stitch holders. All 4 tops have a gap of 12 stitches between the two front pieces. It is now necessary to align the lace so it overlaps by 12 stitches with the remaining 5 on each side extending past the point they cross. Take a look at the graphic to the left for reference.
The five remaining stitches on each side should be knit together with the 5 stitches adjacent to each lace panel. Remove the Provisional CO for the top and place on needles making sure you grab both a lace and top stitch five times on each side of the lace.
You now have all the free stitches on your needles. Place a stitch marker at each side seam as well as one wherever you'd like to begin and end each round. Center back would be a good place to start each round.
Now, referring to the Bottom chart. work the remaining pieces from the empire waist, down. The entire bottom is worked in K2, P2 ribbing. Simply increase where appropriate and adjust for this pattern on the subsequent round.
When you've completed this section, you need only BO, weave in your ends,.
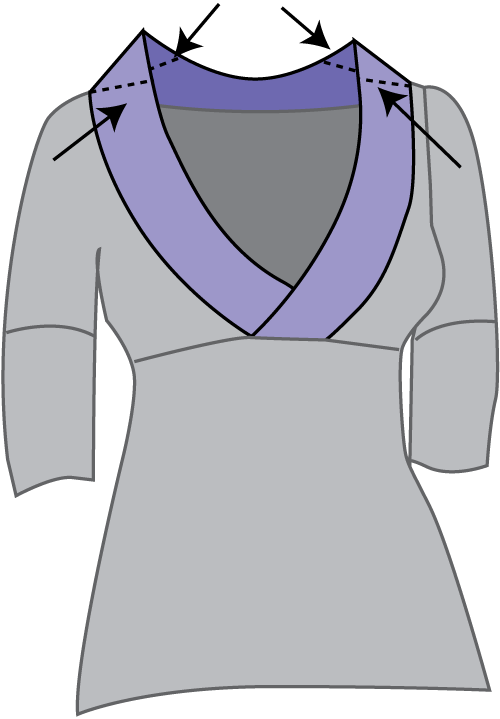
Adjusting the lace
 To
get the lace to sit flat on your shoulders, you will need to sew
two small darts in the lace. You will need some safety pins, a sewing
machine, serger or needle and
thread, water soluble marker or dressmaker's chalk, scissor, and
a mirror.
To
get the lace to sit flat on your shoulders, you will need to sew
two small darts in the lace. You will need some safety pins, a sewing
machine, serger or needle and
thread, water soluble marker or dressmaker's chalk, scissor, and
a mirror.
Mark the point where you did your three needle BO at your shoulders. This is where your shoulder seam is, and where you'll adjust the lace.
Put on your sweater and stand in front of the mirror. On your own, or with the help of a friend pinch the lace in a manner that takes up the excess fabric at each shoulder. Pin the piece using your safety pin, and drop your arms to ensure the fit is comfortable. Adjust as necessary.
 Carefully remove the sweater. With your chalk or marker, draw in your seam lines based on the location of the pins. Check that both sides are even, or if you are uneven, that they seem appropriately asymmetrical.
I would recommend that do this with a serger, if possible or a sewing machine set with a wide zigzag stitch, but this can be done by hand, if necessary. Turn your piece inside out and fold along the lines you just made so that the extra fabric is to the wrong side of the fabric. Sew along these lines using a couple rows of stitches to ensure that seams will be secure.
Hold your breath, make an offering to the knitting goddesses and clip the excess fabric about a quarter inch from the outer most seam line.
Finishing
Simply weave in any remaining ends and block. You are ready to go.
Thank you so much for your interest in my patterns. Most of my free patterns were efforts to learn to design and do not conform to industry standards for sizing or terminology. Enough people continue to knit from these designs that I am happy to leave these patterns up for people to use but I cannot offer any amendments or substantial support for them.
As with all my patterns, you are welcome to use these patterns for your own personal, non-commercial or charitable use. If you wish to sell items made from these patterns or teach classes using my patterns, please contact me. Please do not distribute this pattern in print or electronically or post this pattern to your own site or publication. If you wish to share this pattern, please send the person a link to my site.